
Alexa Skill for Notes
Let’s play with Alexa by adding a new simple skill to make notes. Though adding notes as skill is quite simple, it makes use of most of the features in Alexa.
First, these are two examples of what we can do with Alexa:
“Alexa, open restaurant finder for breakfast”
- Alexa: turn on the Alexa device
- Open: the command (start, launch, begin, resume, ask, tell)
- Restaurant Finder: Invocation name – For Breakfast: Utterance
Slots:
"I want a {pet} that's {size}, {energy} energy, for my {temperament}"
          -----        –-----  --------                -------------
           dog         tiny
                       small
                       medium
                       large
This post is a summary of the tutorial in Amazon Docs.
Create Amazon Accounts
- In Developer Amazon in order to register/deploy your skills.
- In AWS Console in order to deploy the backend (AWS Lambda functions).
Create Alexa Skill
- Go to Alexa Developer Amazon and click on “Create Skill”
- Type the skill name and choose the Custom interaction model:
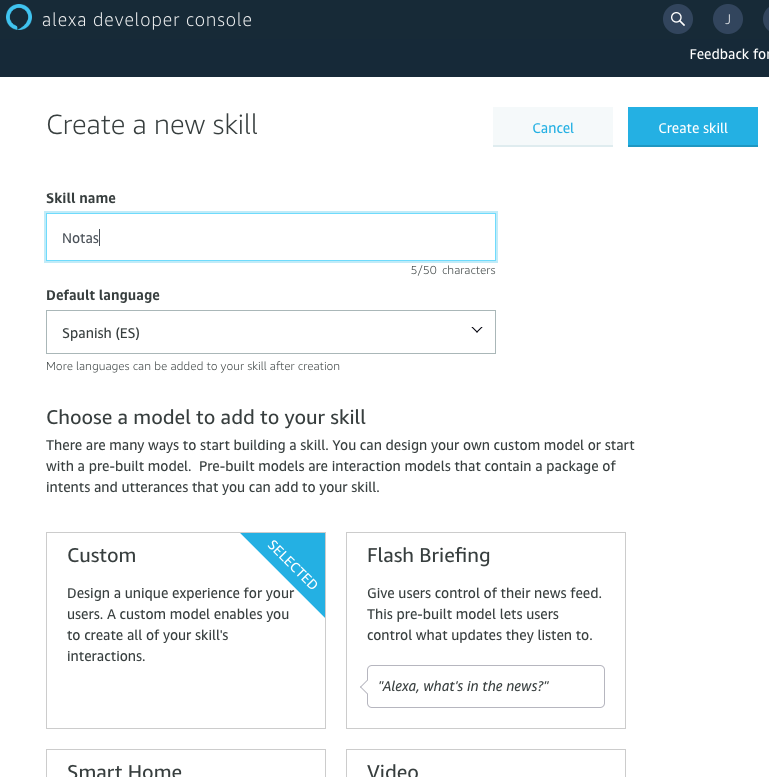
This name uniquely identifies your skill. The interaction model is how your skill will interact with customers. There are models that already facilitates to work for Smart Homes, Videos or others. Let’s use Custom here.
Finally, use the preferred language for this skill. We can add more languages later on.
- Click on “Create Skill”.
Amazon provides a very nice UI to configure your skill. However, all the settings end up into a JSON definition. You can see and edit this JSON definition in the “JSON Editor” at left side of the “Build” tab:
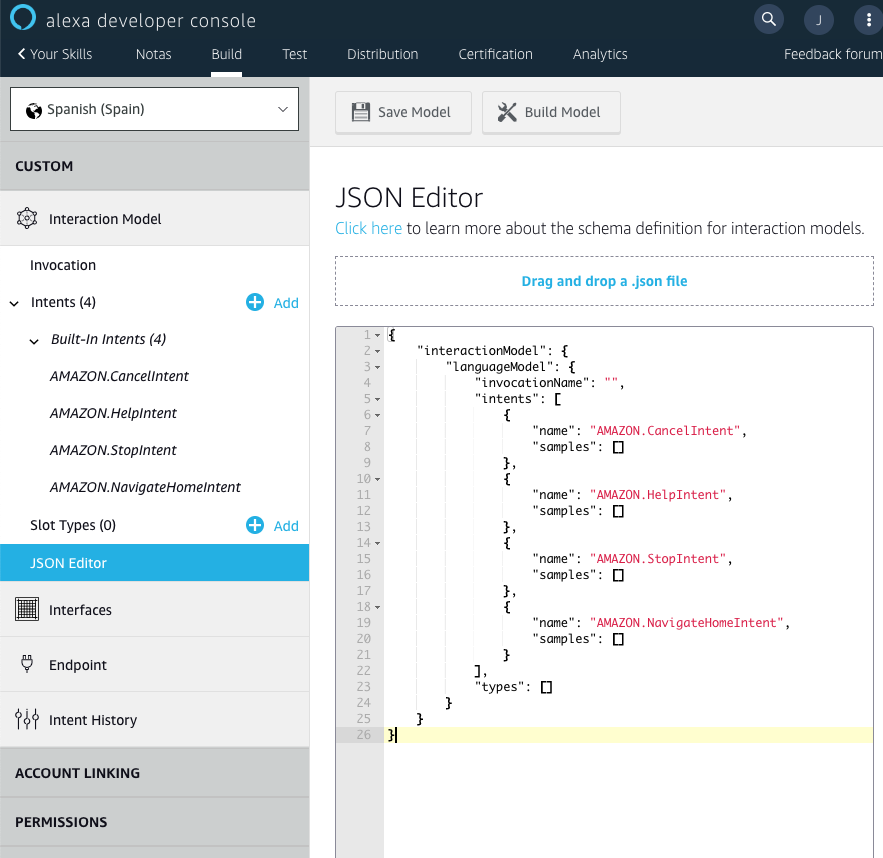
We’ll update directly the JSON definition here.
JSON Definition
By default, this is the definition:
{
    "interactionModel": {
        "languageModel": {
            "invocationName": "",
            "intents": [
                {
                    "name": "AMAZON.FallbackIntent",
                    "slots": [],
                    "samples": []
                },
                {
                    "name": "AMAZON.CancelIntent",
                    "samples": []
                },
                {
                    "name": "AMAZON.HelpIntent",
                    "samples": []
                },
                {
                    "name": "AMAZON.StopIntent",
                    "samples": []
                },
                {
                    "name": "AMAZON.NavigateHomeIntent",
                    "samples": []
                }
            ],
            "types": []
        }
    }
}
The most important bit is the invocationName, this is the entry-point of your skill. We will use “abre mis notas”. Also, the intents are like actions we want to register in our skills. For example:
User: "Alexa, abre mis notas"
Alexa will start up our skill and we'll wait for the next action.
User: "Ayuda"
Alexa will detect "Ayuda" as a "HelpIntent" and we'll configure our skill to provide the options:
Alexa: "Puedes guardar una nota diciendo, 'La nota es: Trabaja duro'".
In addition to the existing intents, we will add a custom intent to add new notes, another one to list the existing notes “ListNotesIntent” and intents to navigate along the user notes:
{
    "interactionModel": {
        "languageModel": {
            "invocationName": "mis notas",
            "intents": [
                {
                    "name": "AMAZON.CancelIntent",
                    "samples": []
                },
                {
                    "name": "AMAZON.HelpIntent",
                    "samples": []
                },
                {
                    "name": "AMAZON.StopIntent",
                    "samples": []
                },
                {
                    "name": "AMAZON.NavigateHomeIntent",
                    "samples": []
                },
                {
                    "name": "NewNoteIntent",
                    "slots": [
                        {
                            "name": "note",
                            "type": "AMAZON.SearchQuery"
                        }
                    ],
                    "samples": [
                        "pon {note}",
                        "escribe {note}",
                        "añade {note}"
                    ]
                },
                {
                    "name": "ListNotesIntent",
                    "slots": [],
                    "samples": [
                        "dime mis notas",
                        "lista"
                    ]
                },
                {
                    "name": "AMAZON.MoreIntent",
                    "samples": []
                },
                {
                    "name": "AMAZON.NextIntent",
                    "samples": []
                },
                {
                    "name": "AMAZON.PreviousIntent",
                    "samples": []
                }
            ],
            "types": []
        }
    }
}
Pay attention that we have declared some samples about how to invoke each intent.
Also, we declared a slot called “note”. This is like a placeholder where we’ll receive the note we’ll persist.
- Finally, click on “Save Model” and then on “Build Model”:
Create the Endpoint (AWS Lambda)
We’ll build a AWS Lambda function in Java 8 and deploy it in AWS Console.
- Create the Maven project with the pom.xml file:
<project xmlns="http://maven.apache.org/POM/4.0.0" xmlns:xsi="http://www.w3.org/2001/XMLSchema-instance"
  xsi:schemaLocation="http://maven.apache.org/POM/4.0.0 http://maven.apache.org/maven-v4_0_0.xsd">
  <modelVersion>4.0.0</modelVersion>
  <groupId>org.sgitario.alexa</groupId>
  <artifactId>notefacs</artifactId>
  <version>1.0</version>
  <packaging>jar</packaging>

  <properties>
    <maven.compiler.source>1.8</maven.compiler.source>
    <maven.compiler.target>1.8</maven.compiler.target>
  </properties>

  <dependencies>
    <dependency>
      <groupId>com.amazon.alexa</groupId>
      <artifactId>ask-sdk</artifactId>
      <version>2.5.5</version>
    </dependency>
  </dependencies>

</project>
Request Handlers
The RequestHandler interface manages one or many conditions. We’ll design a base request handler that works directly with predicates (be intents or types).
This interface will also manage the response using input.getResponseBuilder(). This builder is an utility to return just a speech and/or images, prompt, etc. For our purposes, we’ll always return a text.
This is how looks like our base request handler at the end:
import com.amazon.ask.dispatcher.request.handler.HandlerInput;
import com.amazon.ask.dispatcher.request.handler.RequestHandler;
import com.amazon.ask.model.Response;

public abstract class BaseRequestHandler implements RequestHandler {

	protected abstract String handleInput(NotesHandlerInput input);

	protected abstract Predicate<HandlerInput> canHandle();

	@Override
	public boolean canHandle(HandlerInput input) {
		return input.matches(canHandle());
	}

	@Override
	public Optional<Response> handle(HandlerInput input) {
		String speechText = handleInput(new NotesHandlerInput(input));
		return input.getResponseBuilder().withSpeech(speechText)
				.withSimpleCard("Notes", speechText).withReprompt(speechText)
				.build();
	}

}
For more information about ResponseBuilder and RequestHandler, go to the Alexa Java SDK.
Note we’re wrapping the HandleInput with NotesHandlerInput class. In the NotesHandlerInput class, we’ll have all the bussiness logic that intents have in common like get the user list of notes or save the current note position in order to paginate:
public class NotesHandlerInput {

	public static final String LIST = "list";
	private static final String NOTE_POSITION = "noteCurrentPos";

	private final HandlerInput input;

	public NotesHandlerInput(HandlerInput input) {
		this.input = input;
	}

	public Optional<String> getSlot(String key) {
		String value = null;
		Request request = input.getRequestEnvelope().getRequest();
		if (request instanceof IntentRequest) {
			IntentRequest intentRequest = (IntentRequest) request;
			value = intentRequest.getIntent().getSlots().get(key).getValue();
		}

		return Optional.ofNullable(value);
	}

	@SuppressWarnings("unchecked")
	public List<String> getUserNotes() {
		Map<String, Object> userData = input.getAttributesManager()
				.getPersistentAttributes();
		return (List<String>) userData.computeIfAbsent(LIST,
				k -> new LinkedList<>());
	}

	public void addUserNote(String newNote) {
		getUserNotes().add(newNote);
		persistAttributes();
	}

	public void setNotePositionAt(int pos) {
		input.getAttributesManager().getSessionAttributes().put(NOTE_POSITION,
				pos);
	}

	public int getNotePosition() {
		Map<String, Object> sessionData = input.getAttributesManager()
				.getSessionAttributes();
		return Optional.ofNullable(sessionData.get(NOTE_POSITION))
				.map(v -> (Integer) v).orElse(-1);
	}

	private void persistAttributes() {
		input.getAttributesManager().savePersistentAttributes();
	}

}
- getSlot method: we’re getting the slots from our intent. This is for getting the new note we’ll use afterwards.
- getNotePosition and setNotePositionAt methods: these are using a session attributes. These session attributes will last till the user session is ended. We’ll keep here the current position of the note.
- getUserNotes and persistAttributes methods: these will get user data from the persistence layer. We’ll use DynamoDB here since the Skills SDK is quite good integrate with.
Persistence: DynamoDB starting up
DynamoDB is a very easy and performance NoSQL database provided by Amazon. Let’s see how to configure it for our skill:
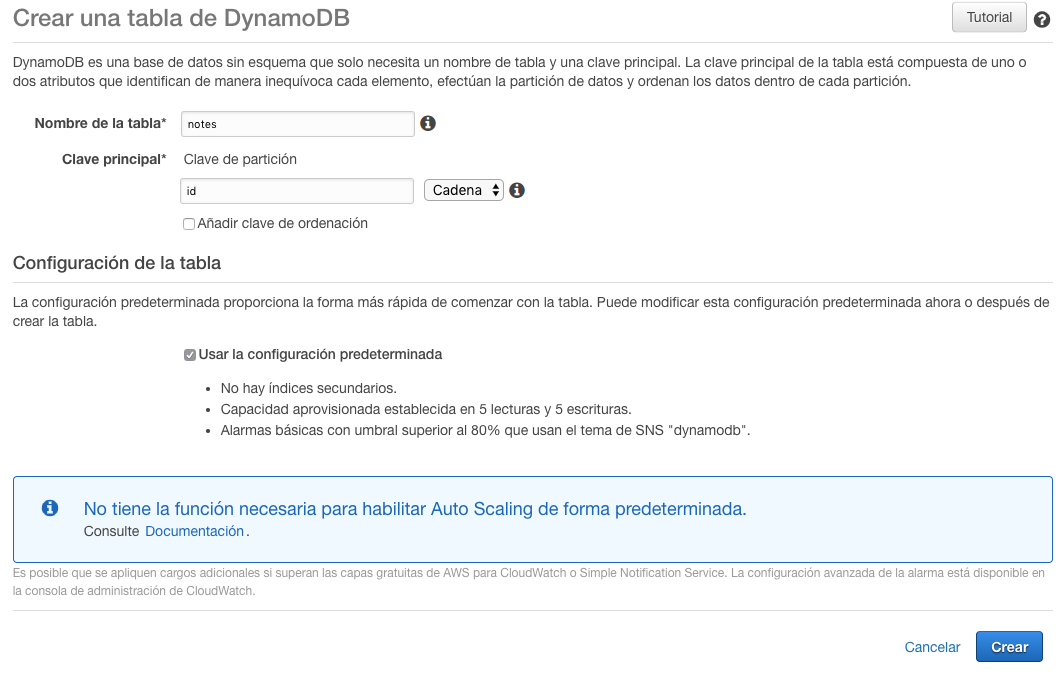
- Go to DynamoDB Console AWS and click on “Create table”
- Name your table as “usernotes”
- Select as primary key “id”: this is the user ID that Alexa provides
- Click on “Create table”
For more information about how the Alexa SDK works with DynamoDB, go to its repository here.
We’re now ready to start working on our intents.
Launch Request Intent
Besides intents, we can handle different input like launch requests (a new incoming request). It works as the other request handlers:
public class LaunchRequestHandler extends BaseRequestHandler {

	@Override
	protected Predicate<HandlerInput> canHandle() {
		return requestType(LaunchRequest.class);
	}

	@Override
	protected String handleInput(NotesHandlerInput input) {
		return "Bienvenido a tu lista de notas";
	}

}
Default Intents
As we said above, we’ll support some default intents: Help, Stop and Cancel.
- Help Intent
public class HelpIntentHandler extends BaseRequestHandler {

	@Override
	protected Predicate<HandlerInput> canHandle() {
		return intentName("AMAZON.HelpIntent");
	}

	@Override
	protected String handleInput(NotesHandlerInput input) {
		return "Puedo guardar tus notas. Prueba a decir, guarda, y seguidamente, esta nueva nota.";
	}

}
- Stop or Cancel Intents
public class CancelandStopIntentHandler extends BaseRequestHandler {

	@Override
	protected Predicate<HandlerInput> canHandle() {
		return intentName("AMAZON.StopIntent")
				.or(intentName("AMAZON.CancelIntent"))
				.or(intentName("AMAZON.NoIntent"));
	}

	@Override
	protected String handleInput(NotesHandlerInput input) {
		return "Adiós";
	}
}
Custom Intents
This is where our business logic will:
- Create New Notes
public class NewNoteIntentHandler extends BaseRequestHandler {

	public static final String SLOT_NEW_NOTE = "note";

	@Override
	protected Predicate<HandlerInput> canHandle() {
		return intentName("NewNoteIntent");
	}

	@Override
	protected String handleInput(NotesHandlerInput input) {
		input.getSlot(SLOT_NEW_NOTE).ifPresent(input::addUserNote);
		return "Guardado";
	}

}
- List Your Notes
public class ListNotesIntentHandler extends BaseRequestHandler {

	@Override
	protected Predicate<HandlerInput> canHandle() {
		return intentName("ListNotesIntent").or(intentName("AMAZON.NextIntent"))
				.or(intentName("AMAZON.MoreIntent"));
	}

	@Override
	protected String handleInput(NotesHandlerInput input) {
		List<String> list = input.getUserNotes();
		if (list.isEmpty()) {
			return "No tiene ninguna nota";
		}

		int currentPosition = input.getNotePosition() + 1;
		if (currentPosition >= list.size()) {
			return "No hay más notas";
		}

		input.setNotePositionAt(currentPosition);
		return list.get(currentPosition);
	}

}
Note here we’re mixing our custom intent “ListNotesIntent” with in-build intents “AMAZON.NextIntent” and “AMAZON.MoreIntent”.
- Previous Note
public class PreviousIntentHandler extends BaseRequestHandler {

	@Override
	protected Predicate<HandlerInput> canHandle() {
		return intentName("AMAZON.PreviousIntent");
	}

	@Override
	protected String handleInput(NotesHandlerInput input) {
		List<String> list = input.getUserNotes();
		if (list.isEmpty()) {
			return "No tiene ninguna nota";
		}

		int currentPosition = input.getNotePosition();
		if (currentPosition < 0) {
			return "No hay ninguna nota anterior";
		}

		String previousNote = list.get(currentPosition);
		input.setNotePositionAt(--currentPosition);
		return previousNote;
	}

}
Here, we’re overwriting an in-build intent “AMAZON.PreviousIntent”.
Main Stream Handle
After adding all our handlers, we need to register them with SkillStreamHandler:
public class NotesStreamHandler extends SkillStreamHandler {

	public NotesStreamHandler() {
		super(Skills
				.standard()
					.withTableName("usernotes")
					.withDynamoDbClient(AmazonDynamoDBClientBuilder.defaultClient())
					.addRequestHandlers(new LaunchRequestHandler(),
							new HelpIntentHandler(),
							new CancelandStopIntentHandler(),
                            new NewNoteIntentHandler(),
							new ListNotesIntentHandler(),
							new PreviousIntentHandler())
				.build());
	}

}
This class is the entry point for the AWS Lamdba. Let’s see now how to build and deploy.
Build
In order to compile and package our lambda application, we can run:
mvn clean assembly:assembly -DdescriptorId=jar-with-dependencies package
The file notefacs-1.0-jar-with-dependencies.jar will be generated.
Deployment
-
In AWS Lambda Console and click on “Create Function”.
-
Name your function accordingly, select Java 8 and choose a restricted role for this lambda only:
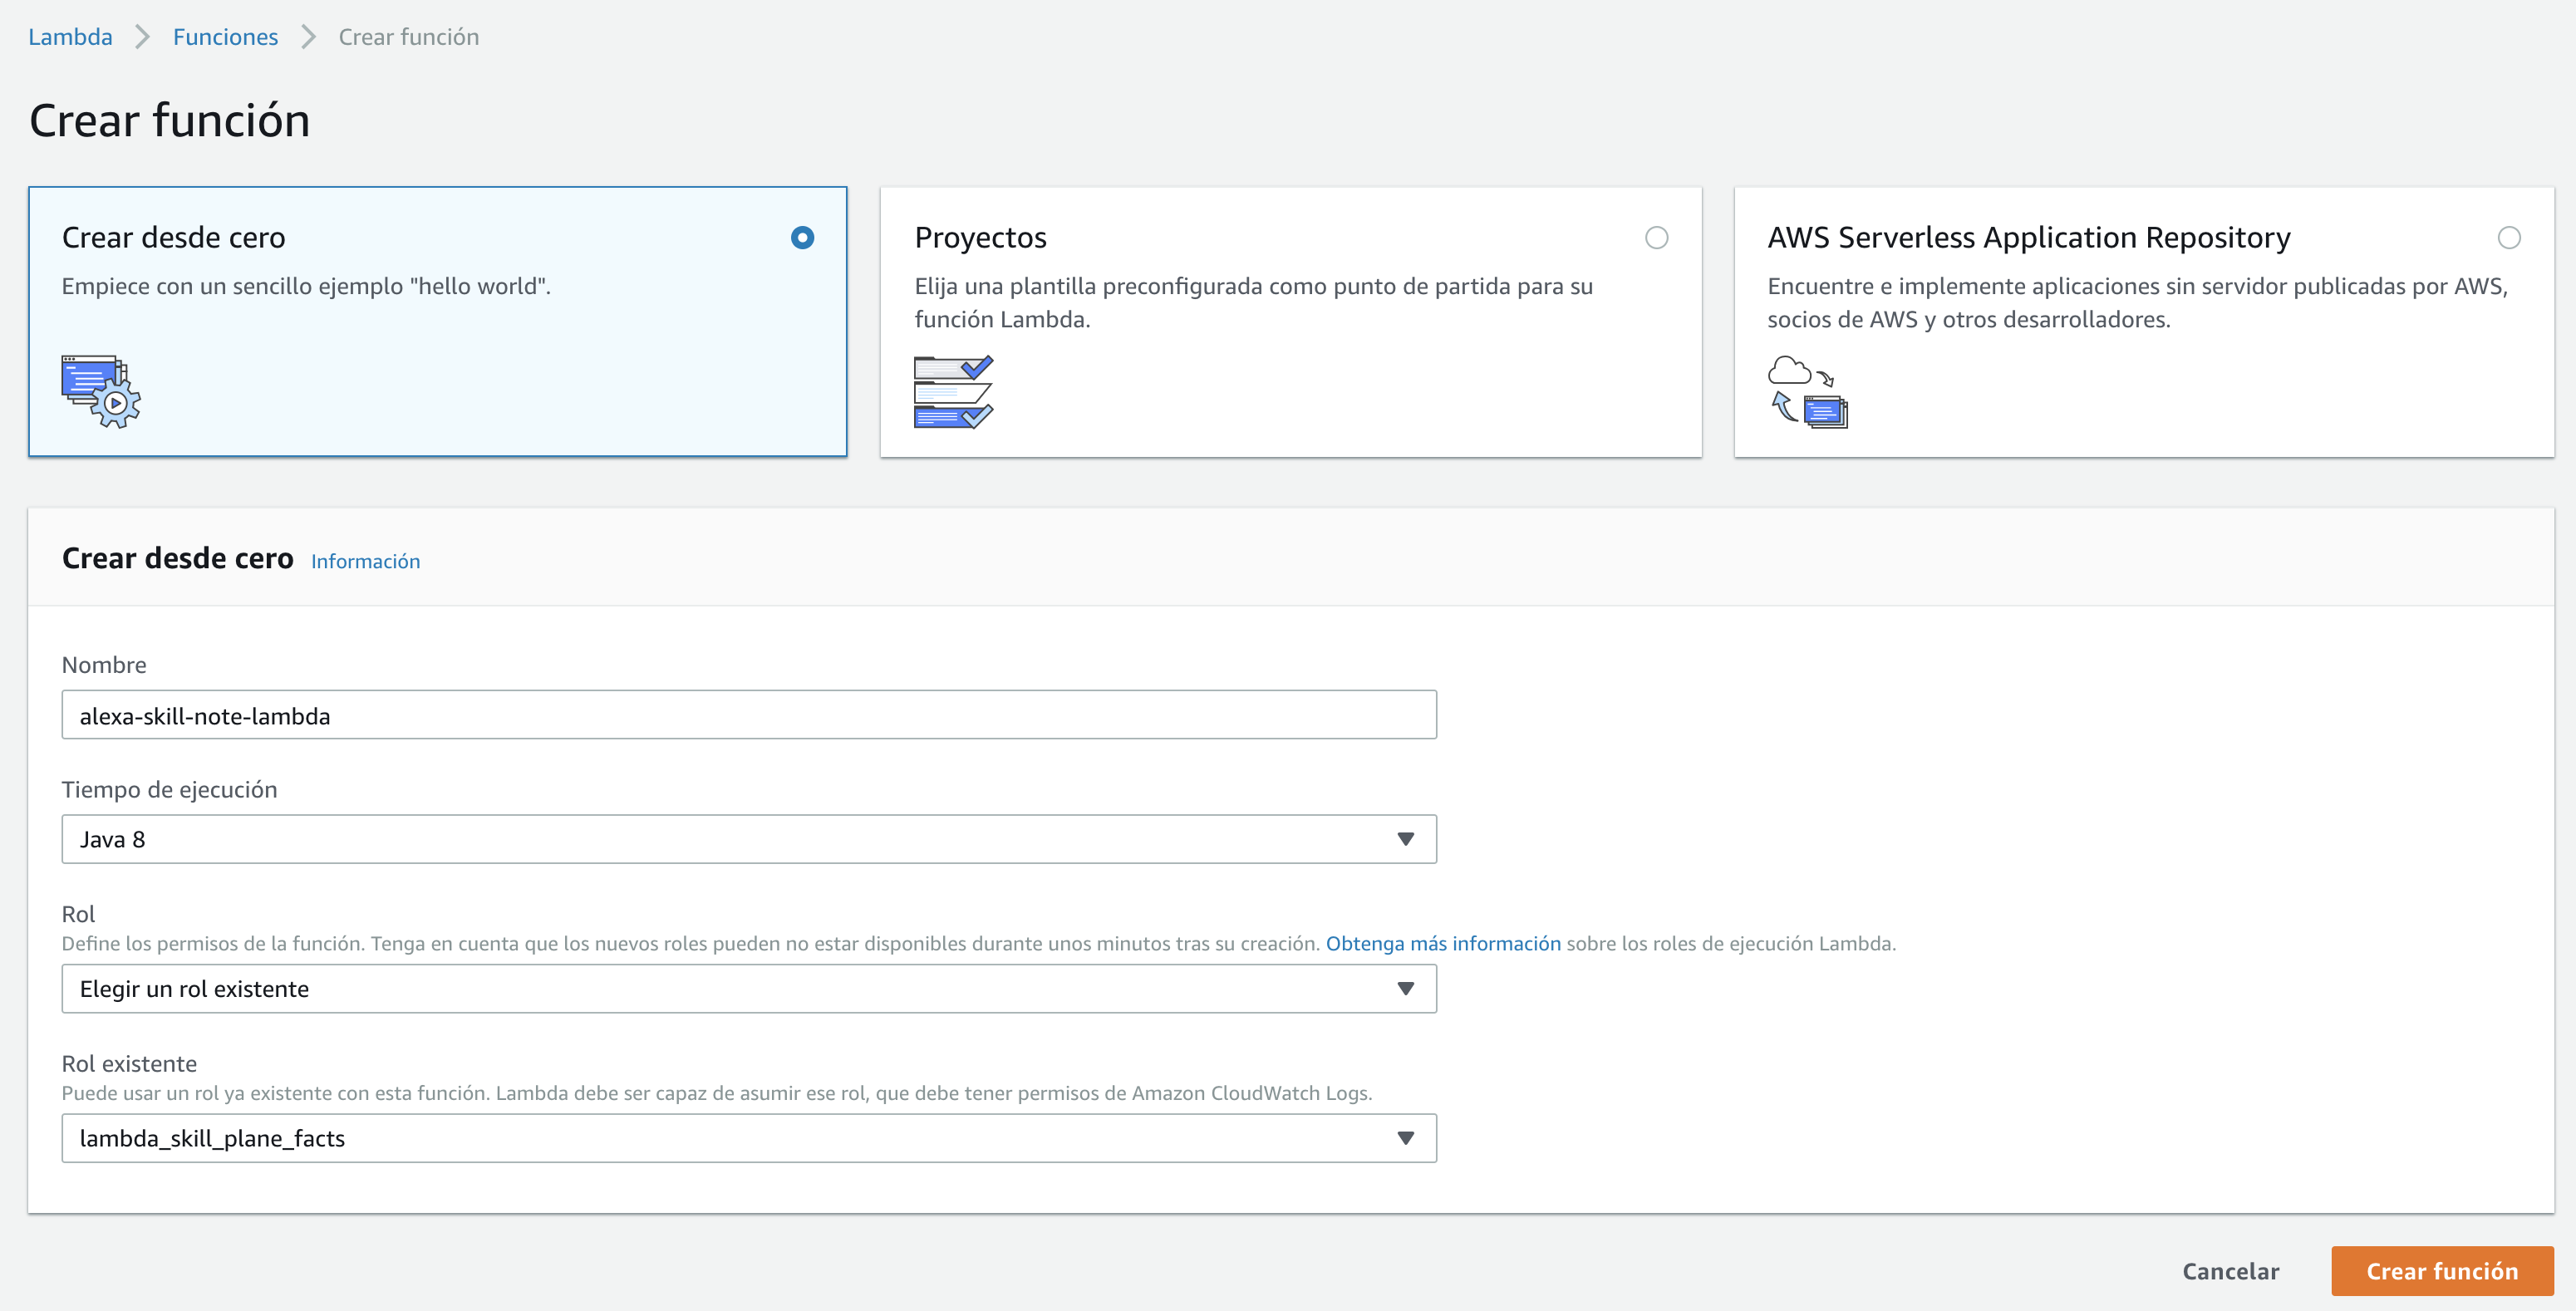
-
Click on “Create Function”.
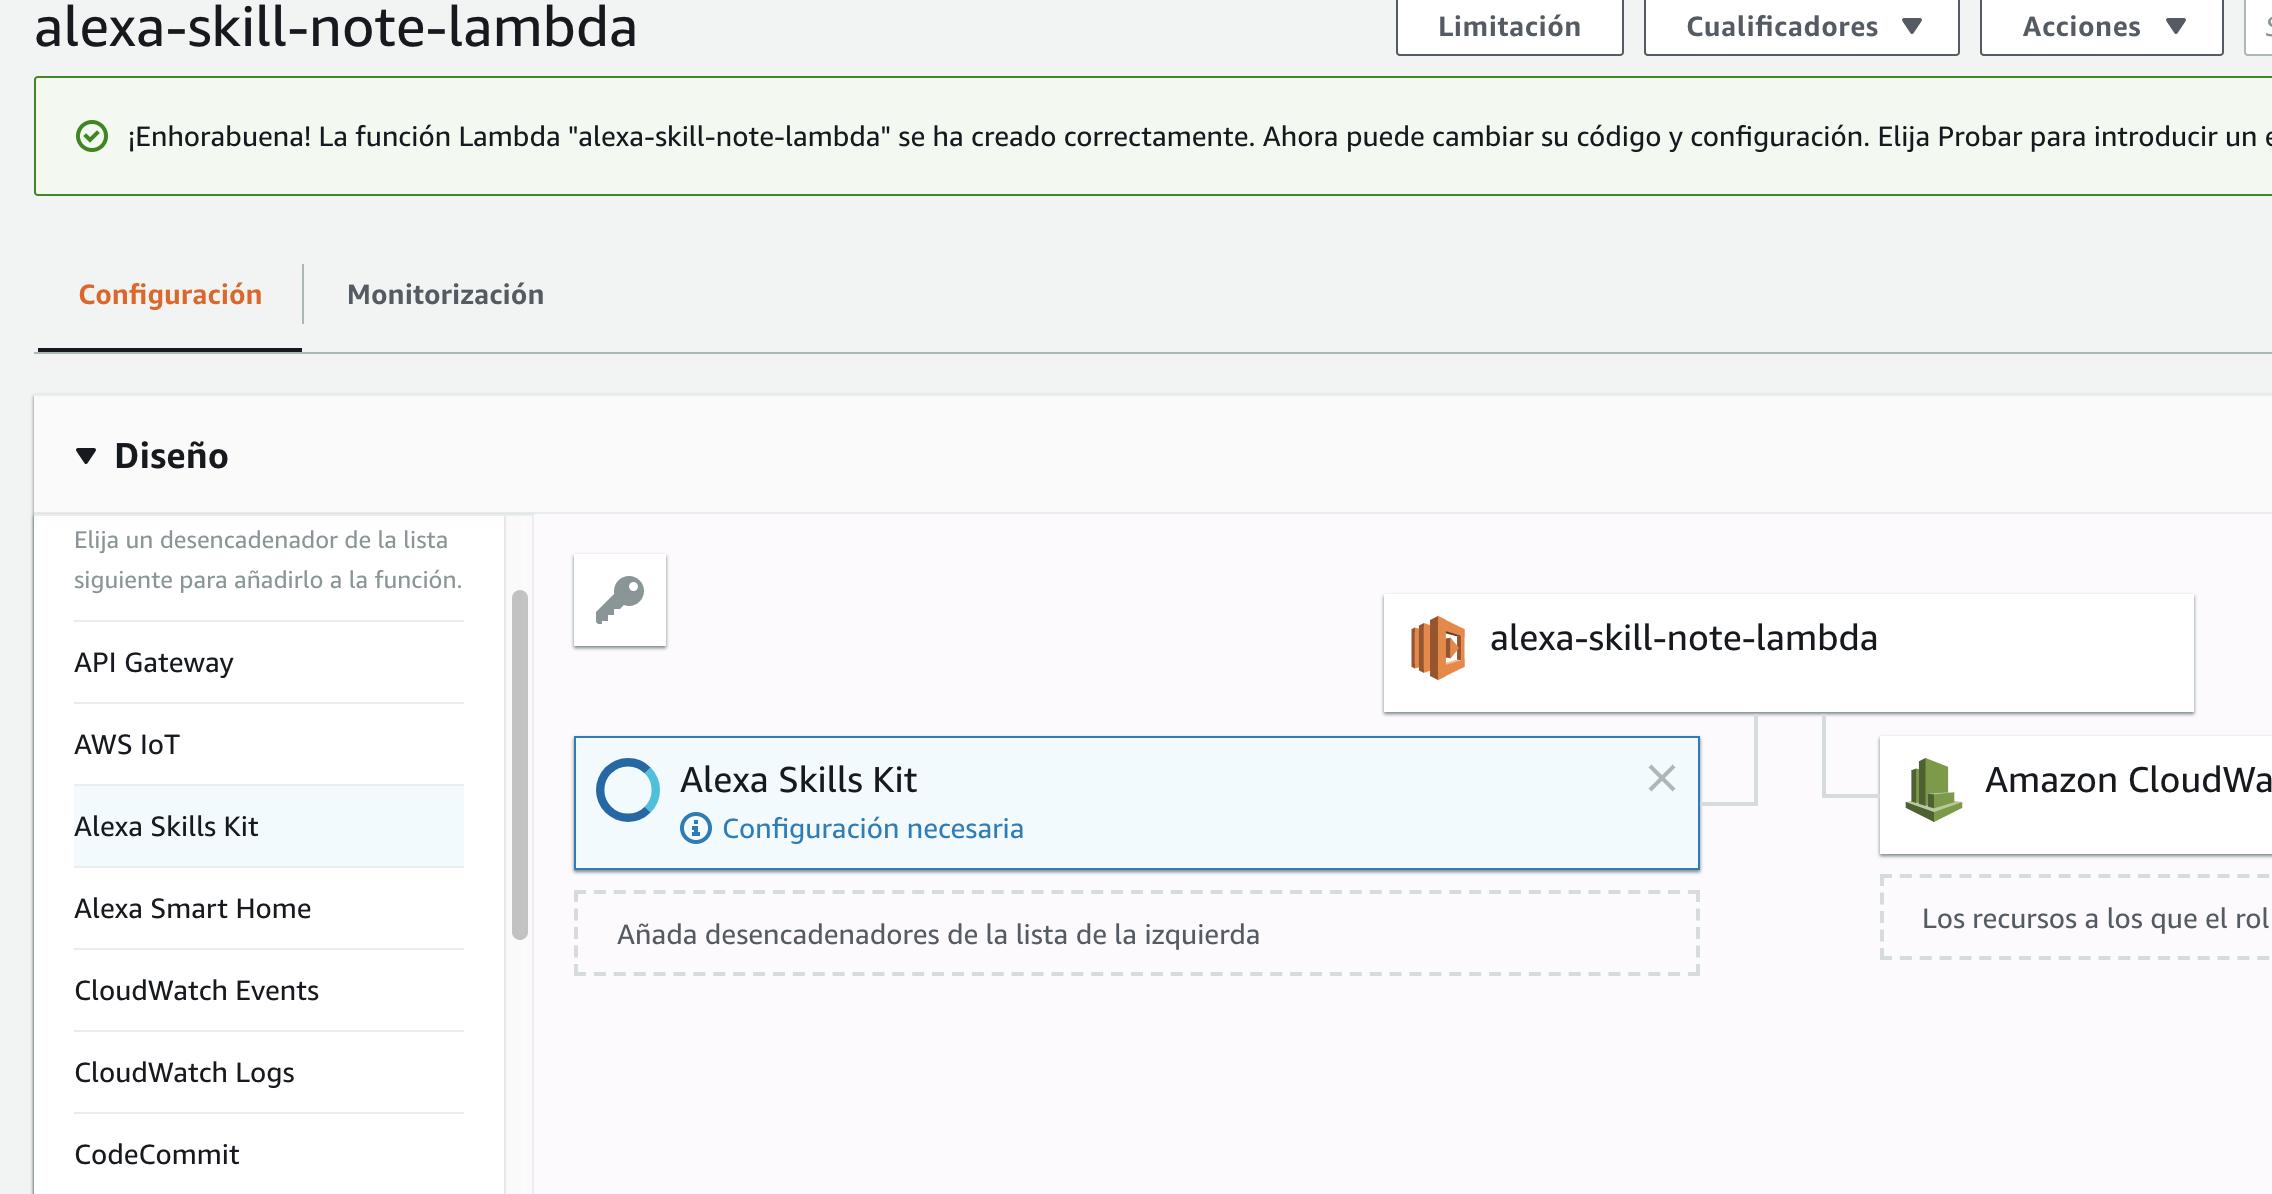
-
Add Alexa Skills Kit from the right list:
- Then fill the Alexa Skills Kit with your Skill ID:
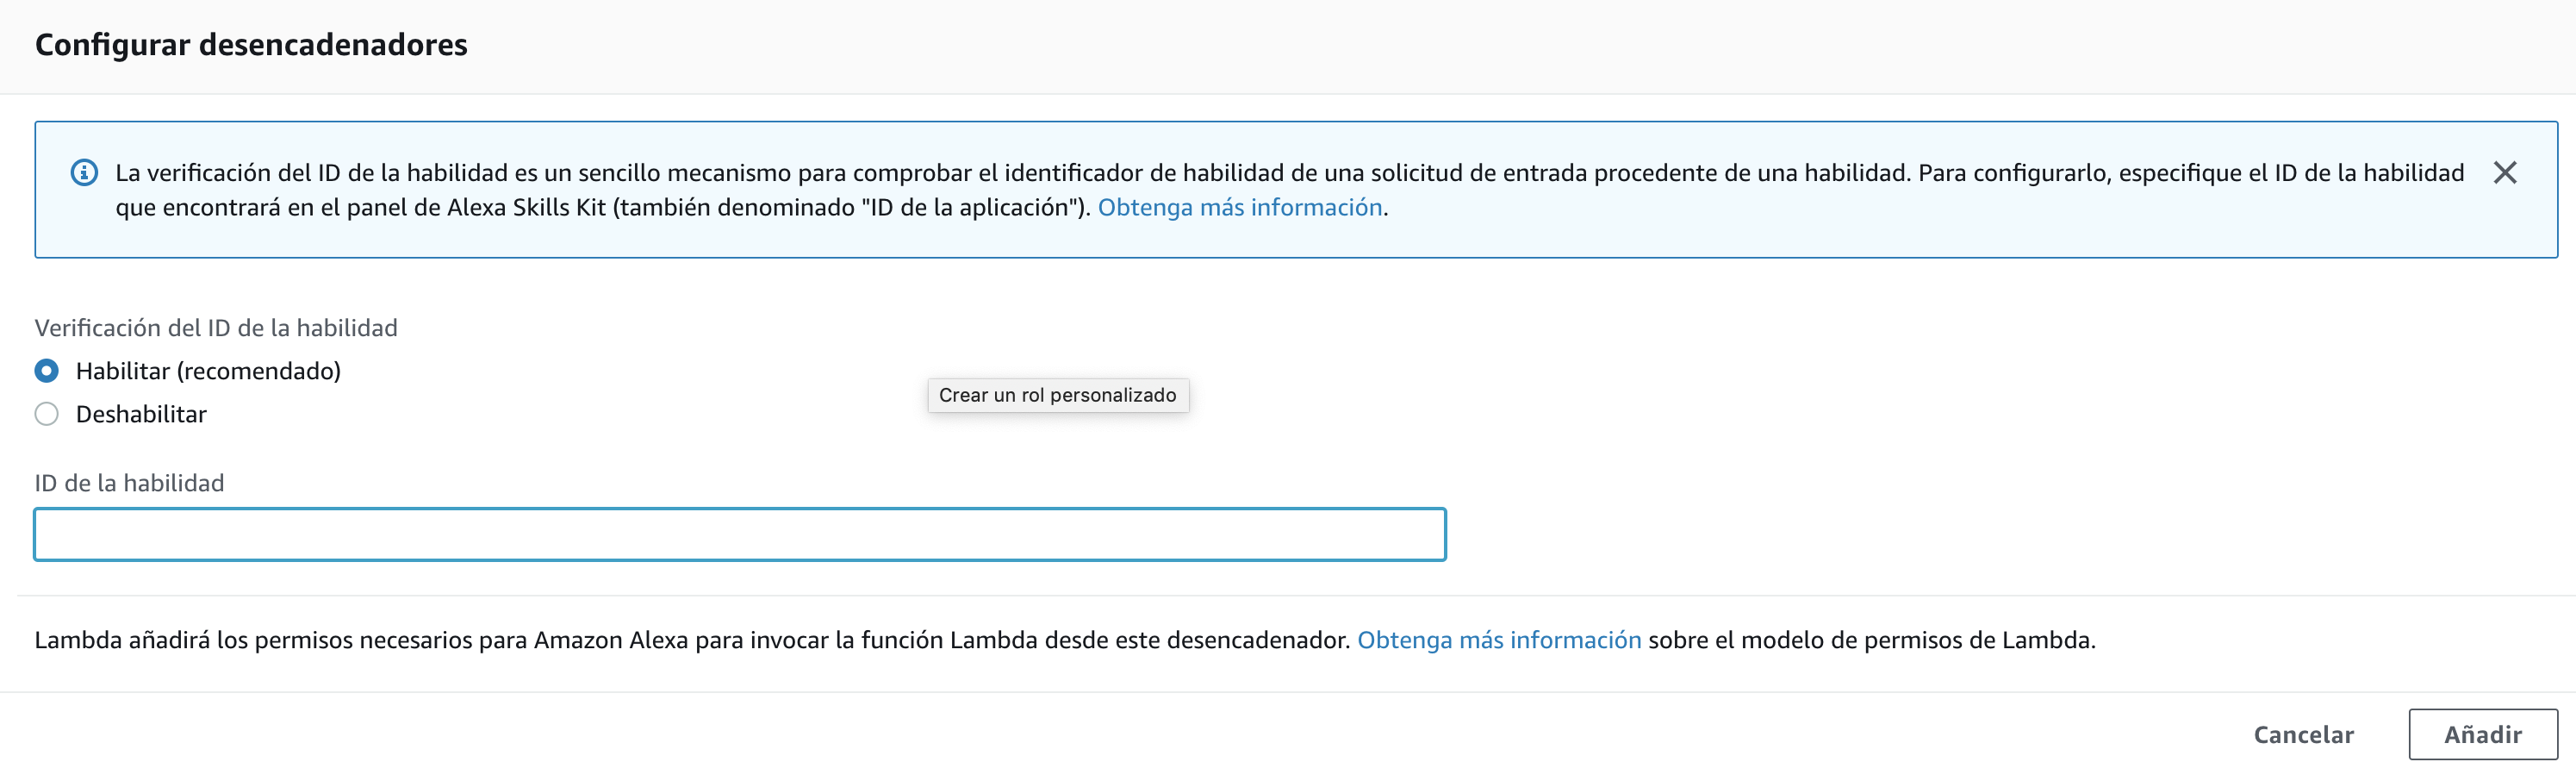
We can find your skill ID in your skills acount:

This will ensure our lambda function is only called from our skill.
- Finally, upload your application jar, update the controller to “org.sgitario.alexa.notes.NotesStreamHandler::handleRequest” and click on save.

Testing
Let’s test our skill end-to-end with the backend.
- Go to Alexa Developer Amazon and select your skill.
- Then click on “Endpoint” and fill the form with your AWS Lambda data:
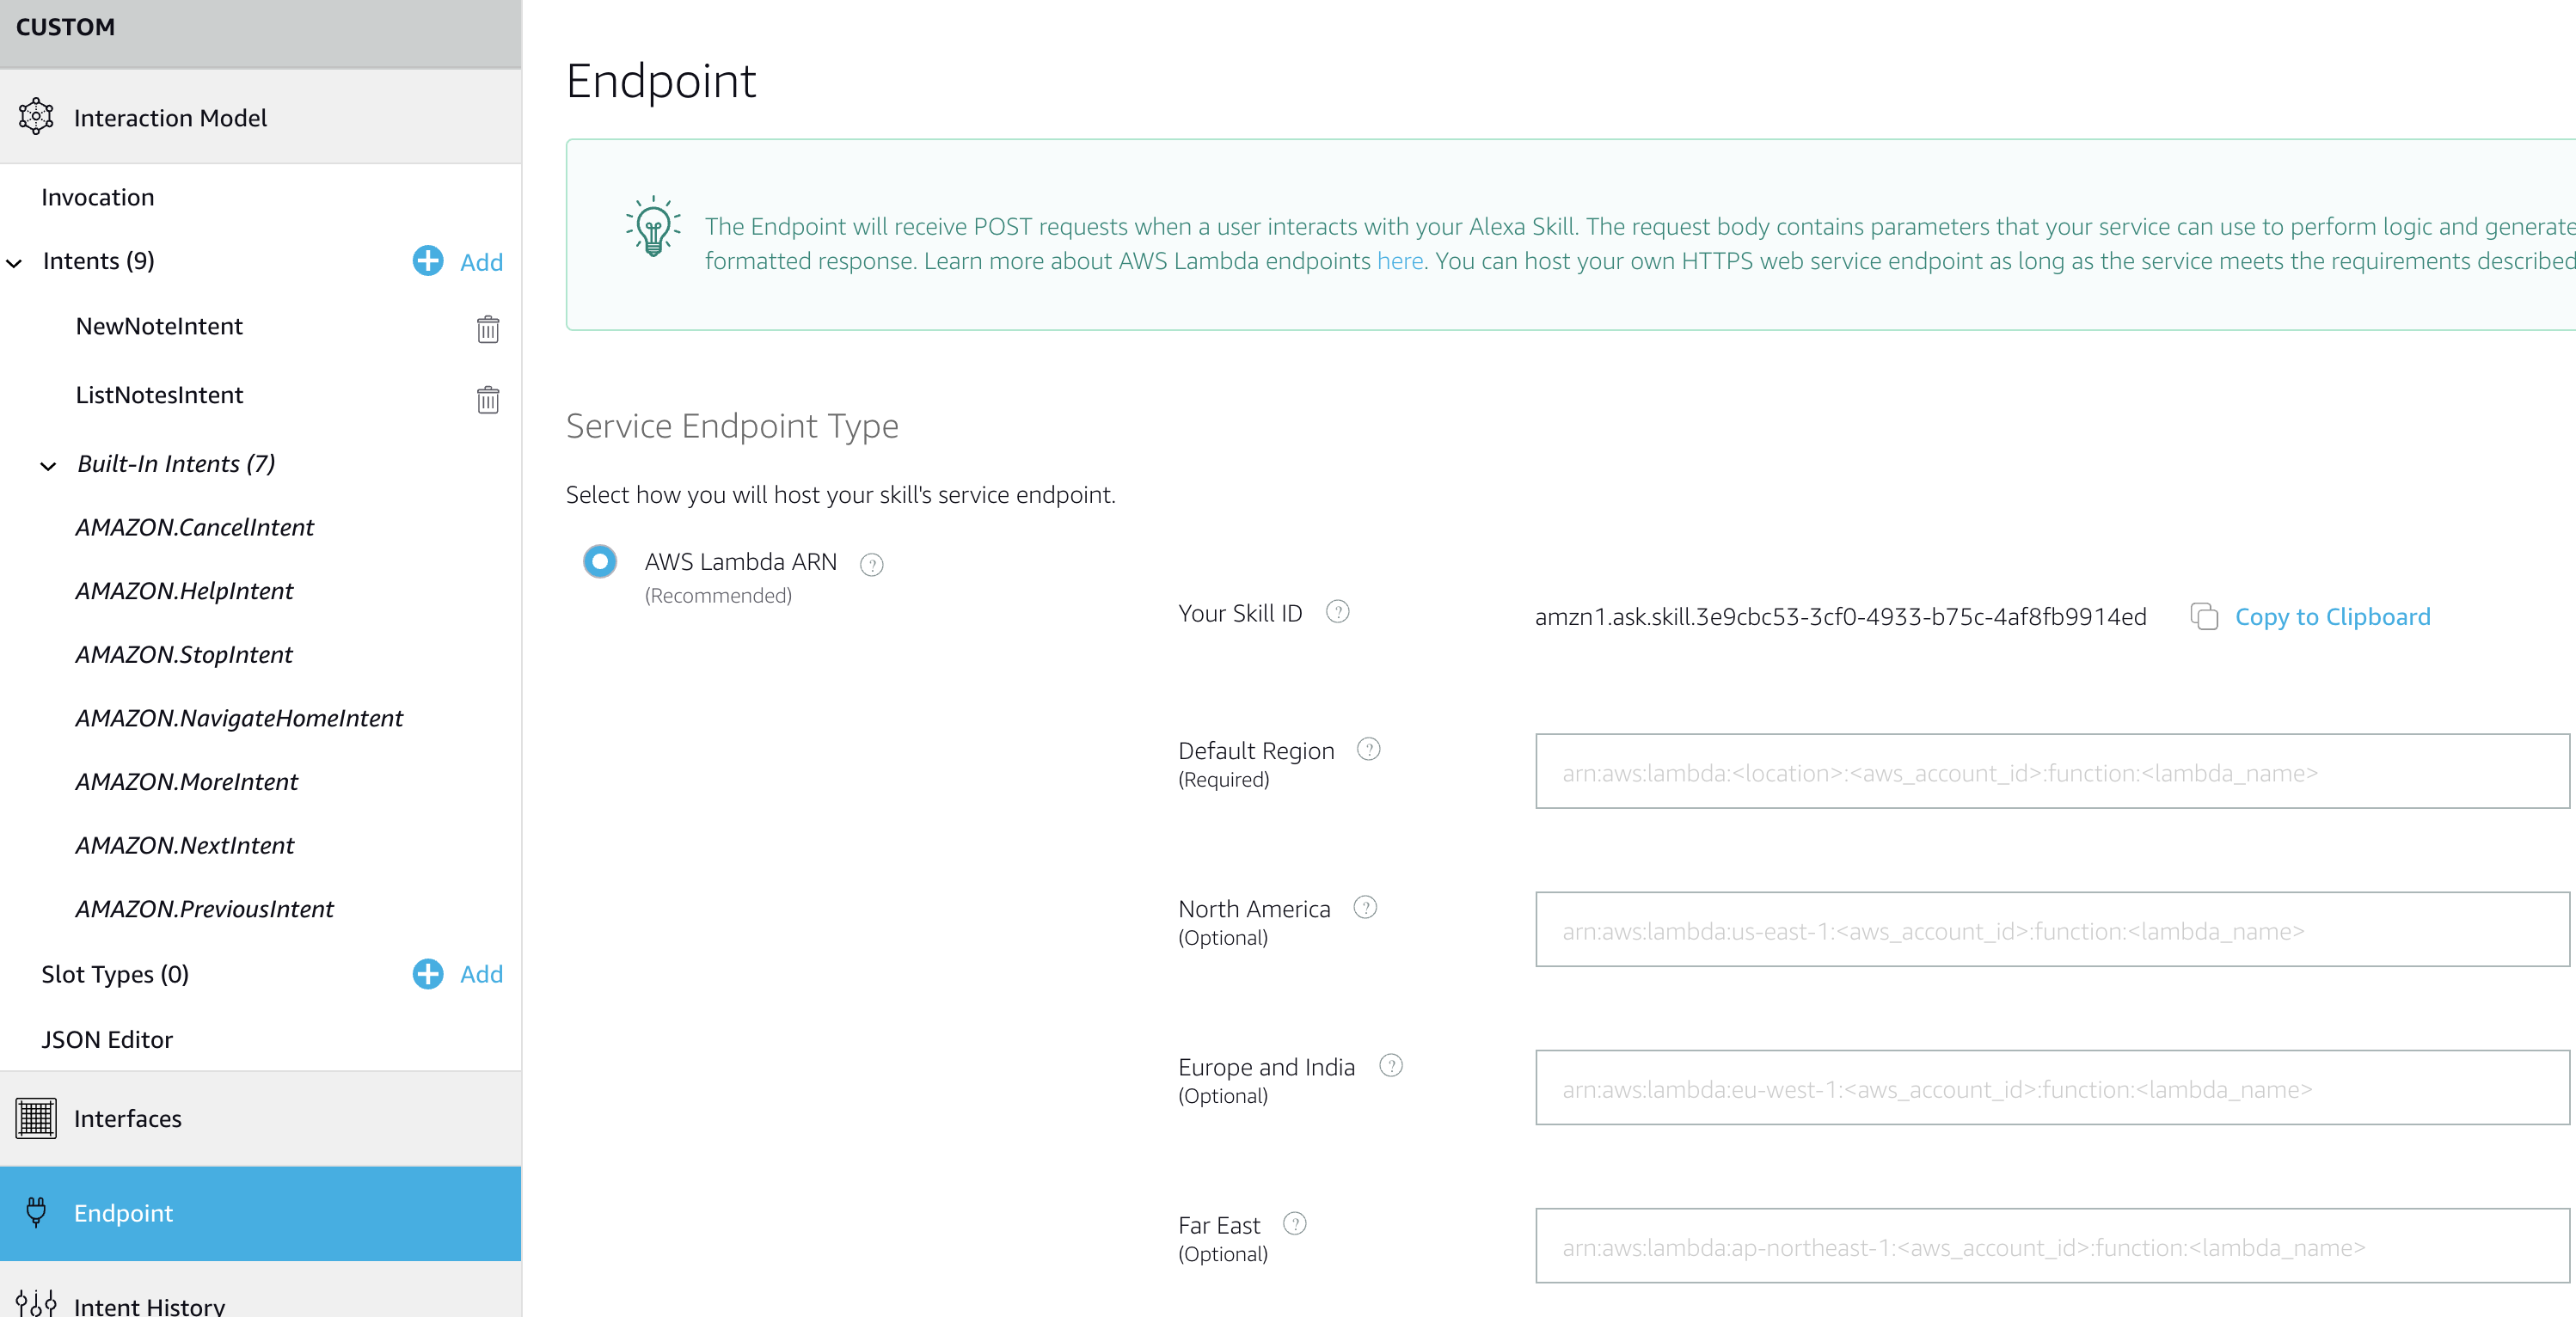
We can find the AWS Lambda ARN at top-right corner in the AWS Lambda form.
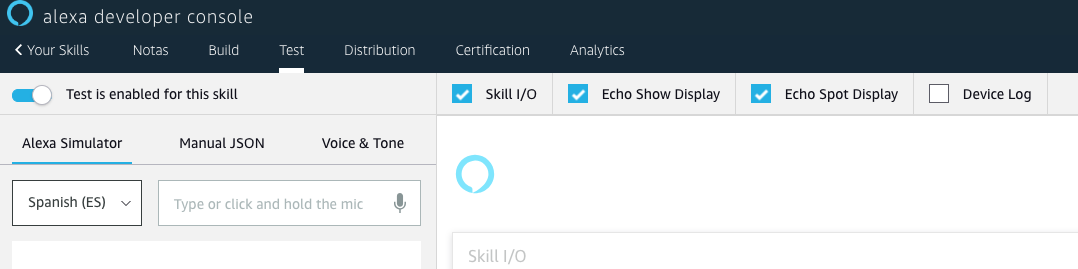
- Go to the Test tab and enable the test feature for this skill:
Conclusion
We’re been using the Alexa SDK v2 and there were lot of improvements in comparison to the v1. However, there are still lot of space for refactor in the SDK. I’ll be attending to an Alexa workshop in Barcelona by one Alexa developer and stated that they are more focused on the Node.js SDK.
I didn’t cover the utterances or custom slot type and some other advanced features in Alexa. I’ll do in the future.
See my Github repository for a full example.