Introduction to Spring Cloud Data Flow
This tutorial is an introduction to Spring Cloud Data Flow which allows us to orchestate streaming and/or batch data pipelines.
- What is a data pipeline?
A flow that receives an event from an input, perform some action(s) and send the result to an output. From here, we can design more sophisticated and complex pipelines. The good thing with Spring Cloud Data Flow is that it’s fully integrated with Spring Integration, so we can implement any message patterns we can achieve with Spring Integration.
- What is an input/output?
The inputs are the Source, the outputs are the Sink and then we have the Processor that consumes the data and returns it to the output. It can be any of these: a RabbitMQ queue, a Kafka, Amazon Kinesis, Google Pub/Sub, Azure Event, a database … or another component within your pipeline.
Quick Overview
Let’s going directly to the point. Spring Cloud Data Flow is a platform that allows us to write pipelines or flows to streaming or batch data. These pipelines will be deployed by the platform.
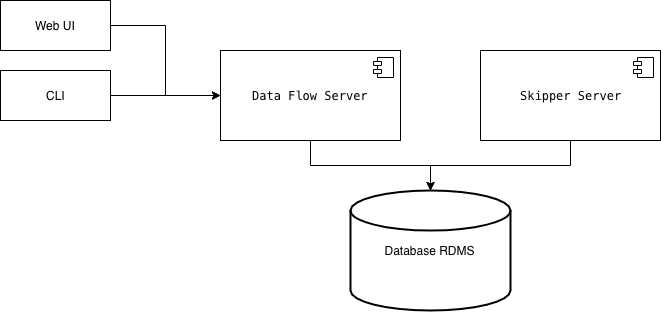
- Data Flow Server: backend for Web and CLI, validate pipelines, registering .jar and docker images, deploying batch jobs, …
- Skipper Server: stream jobs management (deploying, upgrading, history, …)
Both servers use a RDMS database. If not provided, it will use a volatile H2 instance.
To go further in details about the architecture behind, please go to the documentation.
Start up
Let’s start a new instance of our Spring Cloud Data Flow. As usual, we’ll be using Docker Compose for this. The documentation explains really well how to deploy the system using Docker. However, it uses Kafka and MySQL and I rather RabbitMQ and Posgressql. Why? Because I want to try!
version: '3'

services:
  db:
    image: "postgres:alpine"
    container_name: "postgres"
    environment:
      - POSTGRES_USER=root
      - POSTGRES_PASSWORD=rootpw
      - POSTGRES_DB=dataflow
    ports:
      - "5432:5432"
    volumes:
      - ./dataflow-data:/var/lib/postgresql/data

  message_broker:
    image: "rabbitmq"
    container_name: "rabbitmq"
    environment:
      RABBITMQ_DEFAULT_USER: "guest"
      RABBITMQ_DEFAULT_PASS: "guest"
      RABBITMQ_DEFAULT_VHOST: "/"
    ports:
      - "15672:15672"
      - "5672:5672"
    volumes:
      - "./enabled_plugins:/etc/rabbitmq/enabled_plugins"

  dataflow-server:
    image: springcloud/spring-cloud-dataflow-server:${DATAFLOW_VERSION:?DATAFLOW_VERSION is not set!}
    container_name: dataflow-server
    ports:
      - "9393:9393"
    environment:
      - spring.cloud.dataflow.applicationProperties.stream.spring.rabbitmq.host=rabbitmq
      - spring.cloud.dataflow.applicationProperties.stream.spring.rabbitmq.port=5672
      - spring.cloud.dataflow.applicationProperties.stream.spring.rabbitmq.username=guest
      - spring.cloud.dataflow.applicationProperties.stream.spring.rabbitmq.password=guest
      - spring.cloud.skipper.client.serverUri=http://skipper-server:7577/api
      - spring.cloud.dataflow.applicationProperties.stream.management.metrics.export.prometheus.enabled=true
      - spring.cloud.dataflow.applicationProperties.stream.spring.cloud.streamapp.security.enabled=false
      - spring.cloud.dataflow.applicationProperties.stream.management.endpoints.web.exposure.include=prometheus,info,health
      - spring.cloud.dataflow.grafana-info.url=http://localhost:3000
      - SPRING_DATASOURCE_URL=jdbc:postgresql://db:5432/dataflow
      - SPRING_DATASOURCE_USERNAME=root
      - SPRING_DATASOURCE_PASSWORD=rootpw
      - SPRING_DATASOURCE_DRIVER_CLASS_NAME=org.postgresql.Driver
    depends_on:
      - message_broker
    volumes:
      - ~/.m2/repository:/root/.m2/repository
    entrypoint: "./wait-for-it.sh db:5432 -- java -jar /maven/spring-cloud-dataflow-server.jar"

  skipper-server:
    image: springcloud/spring-cloud-skipper-server:${SKIPPER_VERSION:?SKIPPER_VERSION is not set!}
    container_name: skipper
    ports:
      - "7577:7577"
      - "9000-9010:9000-9010"
      - "20000-20105:20000-20105"
    environment:
      - SPRING_CLOUD_SKIPPER_SERVER_PLATFORM_LOCAL_ACCOUNTS_DEFAULT_PORTRANGE_LOW=20000
      - SPRING_CLOUD_SKIPPER_SERVER_PLATFORM_LOCAL_ACCOUNTS_DEFAULT_PORTRANGE_HIGH=20100
      - SPRING_DATASOURCE_URL=jdbc:postgresql://db:5432/dataflow
      - SPRING_DATASOURCE_USERNAME=root
      - SPRING_DATASOURCE_PASSWORD=rootpw
      - SPRING_DATASOURCE_DRIVER_CLASS_NAME=org.postgresql.Driver
    volumes:
        - ~/.m2/repository:/root/.m2/repository
    entrypoint: "./wait-for-it.sh db:5432 -- java -Djava.security.egd=file:/dev/./urandom -jar /spring-cloud-skipper-server.jar"

  # Grafana is configured with the Prometheus datasource.
  # Use `docker exec -it prometheus /bin/sh` to logging in the container
  prometheus:
    image: springcloud/spring-cloud-dataflow-prometheus-local:${DATAFLOW_VERSION:?DATAFLOW_VERSION is not set! Use 'export DATAFLOW_VERSION=local-server-image-tag'}
    container_name: prometheus
    volumes:
      - 'scdf-targets:/etc/prometheus/'
    ports:
      - '9090:9090'
    depends_on:
      - service-discovery

  # The service-discovery container. Required for Prometheus setup only
  # Use `docker exec -it service-discovery /bin/sh` to logging the container
  service-discovery:
    image: springcloud/spring-cloud-dataflow-prometheus-service-discovery:0.0.4.RELEASE
    container_name: service-discovery
    volumes:
      - 'scdf-targets:/tmp/scdf-targets/'
    expose:
      - '8181'
    ports:
      - '8181:8181'
    environment:
      - metrics.prometheus.target.cron=0/20 * * * * *
      - metrics.prometheus.target.filePath=/tmp/scdf-targets/targets.json
      - metrics.prometheus.target.discoveryUrl=http://dataflow-server:9393/runtime/apps
      - metrics.prometheus.target.overrideIp=skipper-server
      - server.port=8181
    depends_on:
      - dataflow-server

  # Grafana SCDF Prometheus pre-built image:
  grafana:
    image: springcloud/spring-cloud-dataflow-grafana-prometheus:${DATAFLOW_VERSION:?DATAFLOW_VERSION is not set! Use 'export DATAFLOW_VERSION=local-server-image-tag'}
    container_name: grafana
    ports:
      - '3000:3000'

volumes:
  scdf-targets:
| If we want our local Data Flow server can see our Maven local repository, we need to add the above line: “~/.m2/repository:/root/.m2/repository” |
This configuration depends on the very common wait-for-it.sh script and the enabled_plugins for rabbitmq. In order to run the compose file, first we need to specify the spring data flow version:
export DATAFLOW_VERSION=2.2.1.RELEASE
export SKIPPER_VERSION=2.1.2.RELEASE
docker-compose up
What is installed after running the docker compose script?
- Spring Data Flow Dashboard: http://localhost:9393/dashboard/#/apps
- Grafana: http://localhost:3000/ (the default username and password is admin/admin)
- RabbitMQ: http://localhost:15672/
Our First Data Pipeline
Let’s create an application with one HTTP POST endpoint to process requests. Each request will go to a queue and be processed by another component. This component takes between 15 to 30 seconds for each request and then will insert a new entry in a table in our database. Alternatively, we can add new requests directly to the queue (using RabbitMQ dashboard for example).
Create new spring boot application
Our application consists of a Web application with Cloud Stream capabilities.
- pom.xml:
<?xml version="1.0" encoding="UTF-8"?>
<project xmlns="http://maven.apache.org/POM/4.0.0"
	xmlns:xsi="http://www.w3.org/2001/XMLSchema-instance"
	xsi:schemaLocation="http://maven.apache.org/POM/4.0.0 http://maven.apache.org/xsd/maven-4.0.0.xsd">
	<modelVersion>4.0.0</modelVersion>

	<groupId>com.sgitario.dataflow</groupId>
	<artifactId>app</artifactId>
	<version>0.0.1-SNAPSHOT</version>

	<parent>
		<groupId>org.springframework.boot</groupId>
		<artifactId>spring-boot-starter-parent</artifactId>
		<version>2.1.5.RELEASE</version>
	</parent>

	<!-- ... -->

	<dependencies>
		<dependency>
			<groupId>org.springframework.cloud</groupId>
			<artifactId>spring-cloud-starter-stream-rabbit</artifactId>
			<version>${spring.cloud.version}</version>
		</dependency>
		<dependency>
			<groupId>org.springframework.boot</groupId>
			<artifactId>spring-boot-starter-web</artifactId>
		</dependency>
		<dependency>
			<groupId>org.projectlombok</groupId>
			<artifactId>lombok</artifactId>
			<scope>provided</scope>
		</dependency>

	</dependencies>

	<!-- ... -->
</project>
- Source Application:
@SpringBootApplication
@EnableBinding(Source.class)
public class SourceApplication {

	public static void main(String[] args) {
		SpringApplication.run(SourceApplication.class, args);
	}
}

@Validated
@RestController
@RequiredArgsConstructor
public class RestService {
	private final Source queue;

	@PostMapping("/requests/{requestId}")
	public void handleRequest(@NotNull @PathVariable("requestId") String requestId) throws InterruptedException {
		queue.output().send(MessageBuilder.withPayload(requestId).build());
	}
}
- Processor Application:
@SpringBootApplication
@EnableBinding(Source.class)
@Slf4j
public class ProcessorApplication {

	private static final long MILLIS = 1_000l;

	@StreamListener(Processor.INPUT)
	@SendTo(Processor.OUTPUT)
	public String handleMessage(String msg) throws InterruptedException {
		log.info("Consumer {}", msg);
		ThreadLocalRandom random = ThreadLocalRandom.current();
		Thread.sleep(random.nextLong(25, 30) * MILLIS);
		log.info("Done! {}", msg);
		return msg;
	}

	public static void main(String[] args) {
		SpringApplication.run(SourceApplication.class, args);
	}
}
- Sink Application:
@SpringBootApplication
@EnableBinding(Processor.class)
@Slf4j
public class SinkApplication {

	@StreamListener(Processor.OUTPUT)
	public void handleMessage(String msg) throws InterruptedException {
		log.info("Sink {}", msg);
	}

	public static void main(String[] args) {
		SpringApplication.run(SinkApplication.class, args);
	}
}
- Configure Maven to build the jars for each component:
<?xml version="1.0" encoding="UTF-8"?>
<project xmlns="http://maven.apache.org/POM/4.0.0"
	xmlns:xsi="http://www.w3.org/2001/XMLSchema-instance"
	xsi:schemaLocation="http://maven.apache.org/POM/4.0.0 http://maven.apache.org/xsd/maven-4.0.0.xsd">
	<modelVersion>4.0.0</modelVersion>

	<!-- ... -->

	<profiles>
		<profile>
			<id>source</id>
			<properties>
				<main.class>com.api.sample.restful.source.SourceApplication</main.class>
				<scope>source</scope>
			</properties>
		</profile>
		<profile>
			<id>processor</id>
			<properties>
				<main.class>com.api.sample.restful.processor.ProcessorApplication</main.class>
				<scope>processor</scope>
			</properties>
		</profile>
		<profile>
			<id>sink</id>
			<properties>
				<main.class>com.api.sample.restful.sink.SinkApplication</main.class>
				<scope>sink</scope>
			</properties>
		</profile>
	</profiles>

	<!-- ... -->

	<build>
		<plugins>
			<plugin>
				<groupId>org.springframework.boot</groupId>
				<artifactId>spring-boot-maven-plugin</artifactId>
				<executions>
					<execution>
						<id>repackage</id>
						<goals>
							<goal>repackage</goal>
						</goals>
						<configuration>
							<classifier>${scope}</classifier>
						</configuration>
					</execution>
				</executions>
			</plugin>
			<plugin>
				<groupId>org.apache.maven.plugins</groupId>
				<artifactId>maven-jar-plugin</artifactId>
				<configuration>
					<archive>
						<index>true</index>
						<manifest>
							<mainClass>${main.class}</mainClass>
						</manifest>
					</archive>
				</configuration>
			</plugin>
		</plugins>
	</build>
</project>
- Build jars:
mvn clean install -Psource
mvn clean install -Pprocessor
mvn clean install -Psink
The jars are now in our Maven repository.
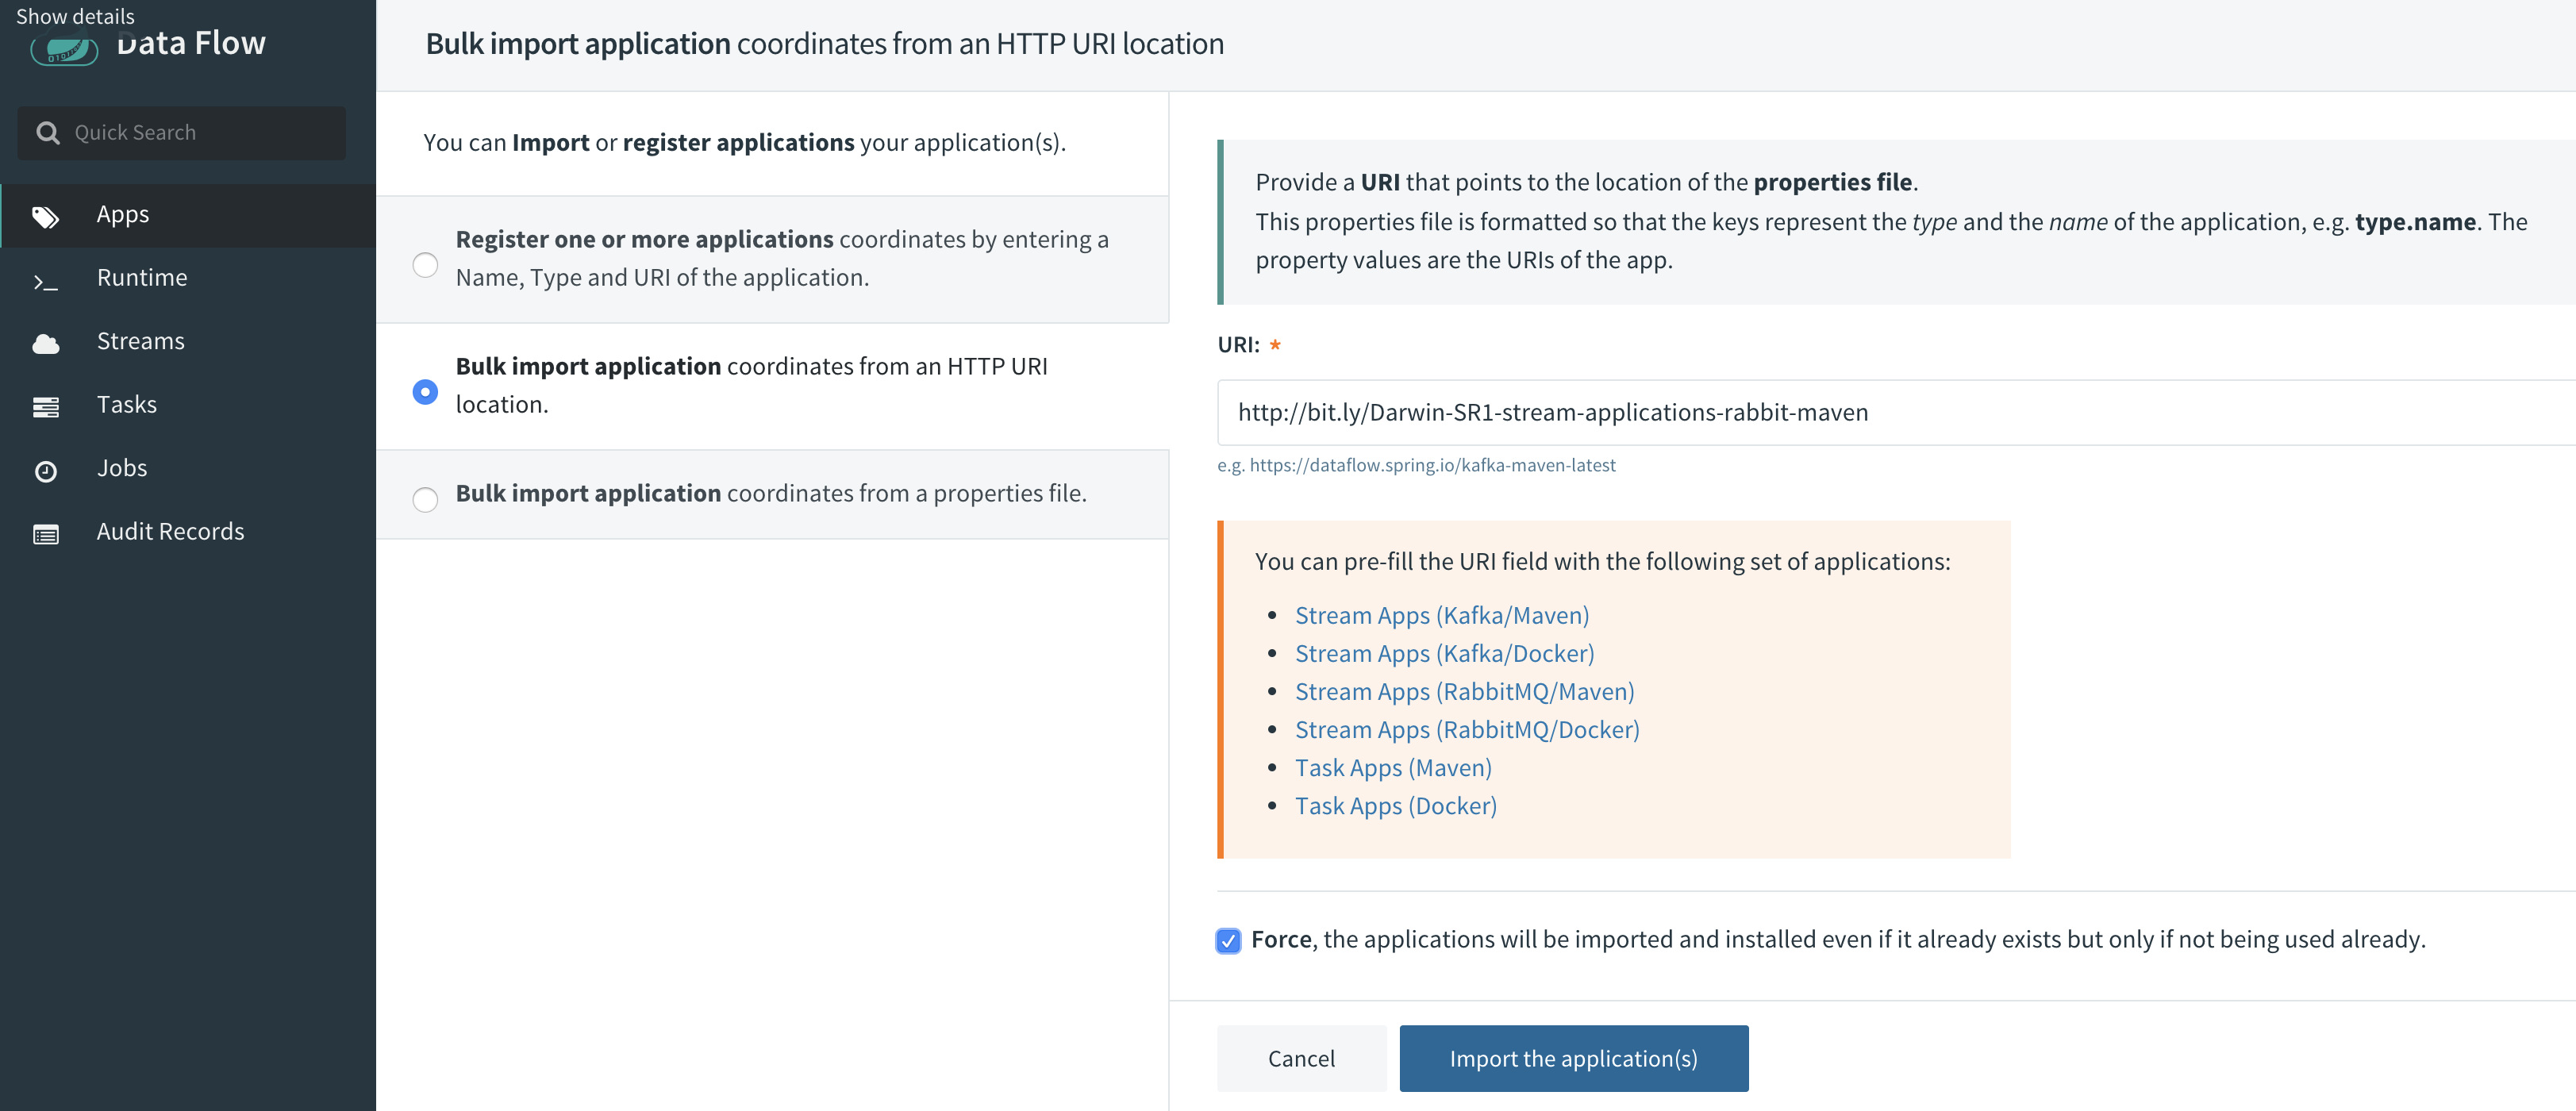
- Deploy the jars into Data Flow server
Go to Apps > Add Application(s) and then add each application:
| Name | Type | Uri |
|---|---|---|
| source | Source | maven://com.sgitario.dataflow:app:jar:source:0.0.1-SNAPSHOT |
| processor | Processor | maven://com.sgitario.dataflow:app:jar:processor:0.0.1-SNAPSHOT |
| sink | Sink | maven://com.sgitario.dataflow:app:jar:sink:0.0.1-SNAPSHOT |
- Create the stream
Go to Streams > Create Stream and select your source, processor and sink and link them each after another.
- Deploy the stream
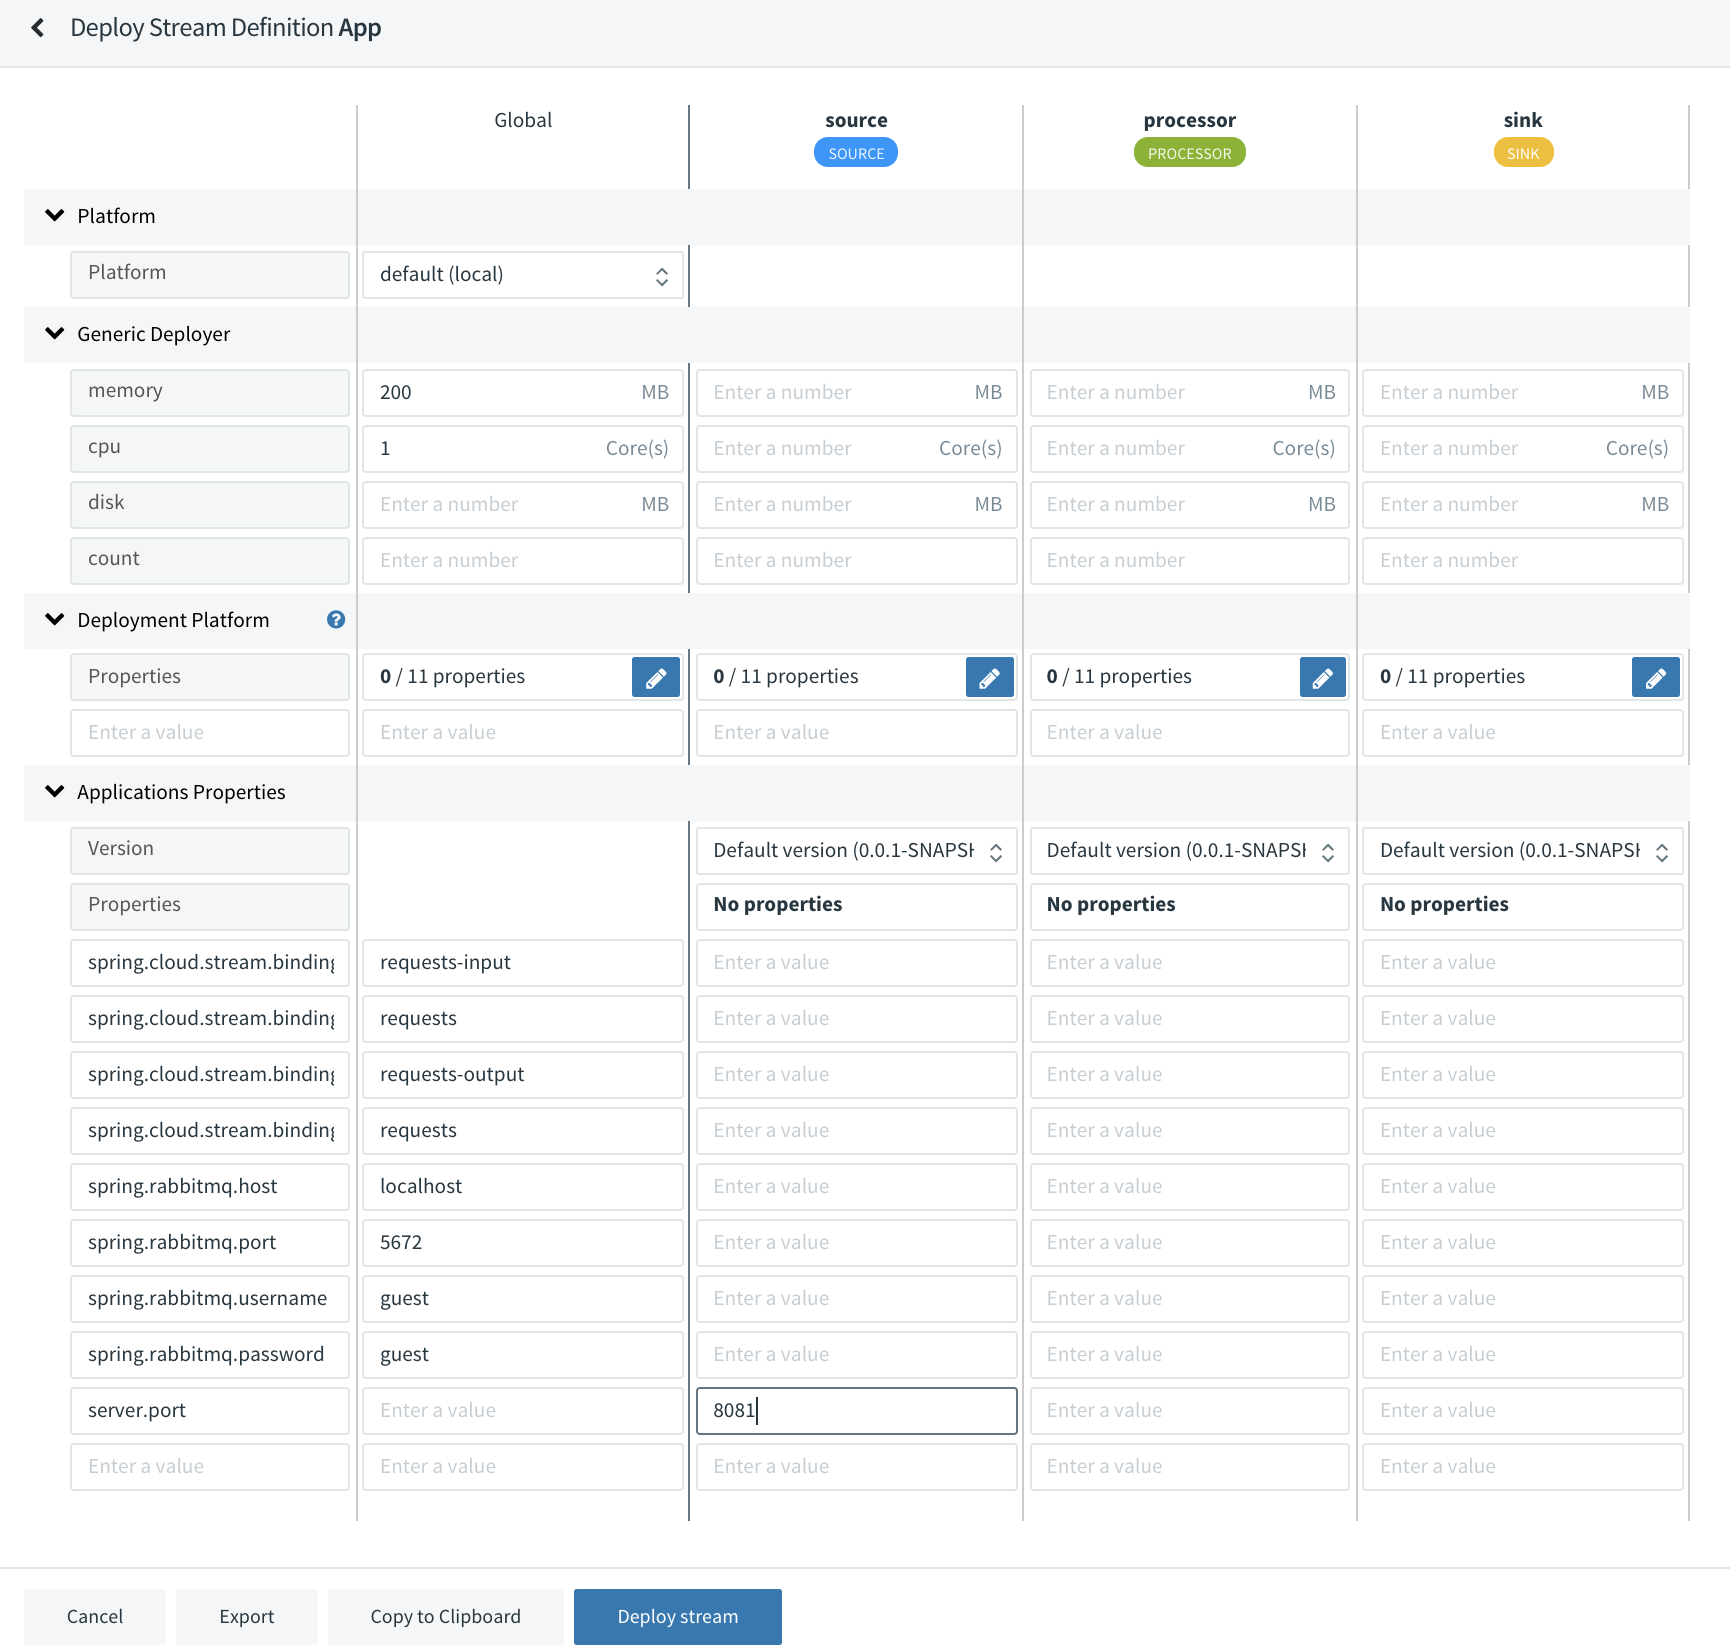
We’re using global properties for RabbitMQ and cpu/memory settings and one application property for our source.
After deploying, our stream is now working fine!
Command Line
We have worked with the Data Flow Dashboard, but we can achieve the same using the CLI.
First, we need to download it from here and run it:
java -jar spring-cloud-dataflow-shell-1.3.0.M1.jar --dataflow.uri=localhost:9393
Then, register our apps and the stream:
dataflow:> app register --name source --type source --uri maven://com.sgitario.dataflow:app:jar:source:0.0.1-SNAPSHOT
dataflow:> app register --name processor --type processor --uri maven://com.sgitario.dataflow:app:jar:processor:0.0.1-SNAPSHOT
dataflow:> app register --name sink --type sink --uri maven://com.sgitario.dataflow:app:jar:sink:0.0.1-SNAPSHOT
dataflow:> stream create --name log-data --definition 'source | processor | sink'
dataflow:> stream deploy --name log-data
Refactor Our Application using Data Flow capabilities
Ehm… That’s all? So far, we have created up to three apps for something that we used to do only in one application… then is this Spring Cloud Data Flow? Not really. Spring Cloud Data Flow is designed to write streams applications with zero code. For example, if we want to implement the above application, we would have only needed to import the basic components to wire up a http-rabbitmq application from here.
Now, when writing our stream, we will see lot of new components of different kind:
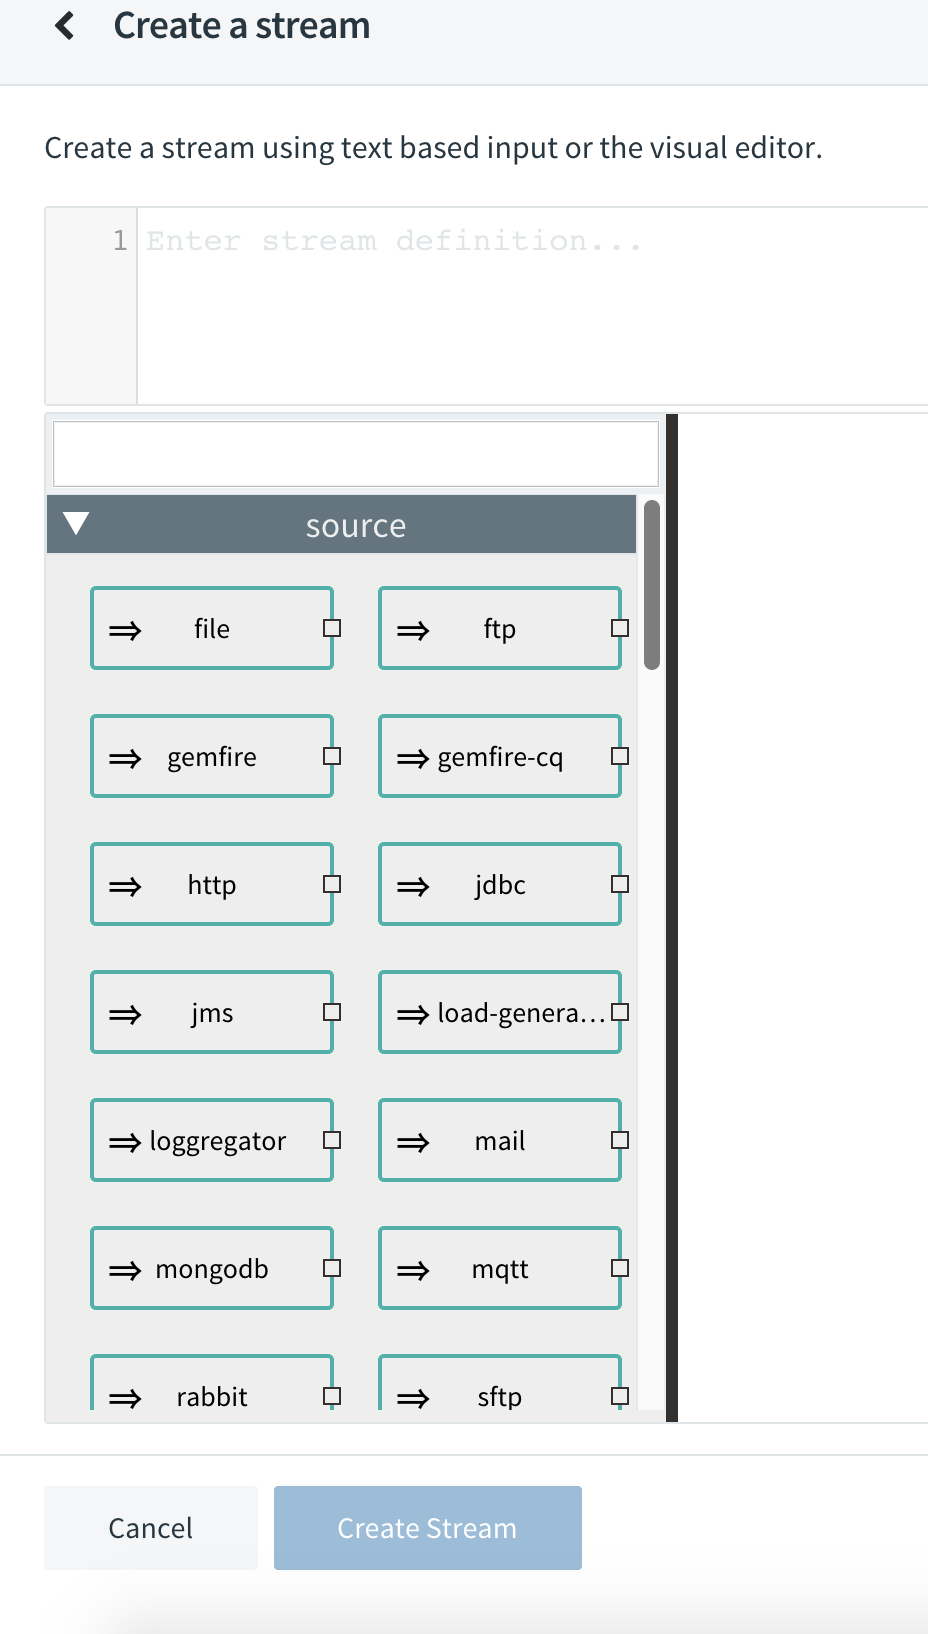
From here, this would be only about to wire up two streams: (1) a http as source and a rabbit as sink; and (2) a rabbit as source, a groovy as processor to wait some time and a log as sink. And configure all the properties accordingly.
Conclusion
Being honest, I’m not a big fan of applications that aim to non technical people can do technical stuff. In real world and according to my experience, the technical people will use these applications in the end.
Spring Cloud Data Flow is really well designed and ease to use, but from my point of view and as other solutions of this type, in mid-long term, it will difficult the troubleshoot of issues since it loses the loop of what the application is doing. Indeed, Grafana would help in here, but still is harder to find something instead of just looking for some logs or traces of an application that you know what is doing and where.
Another topic that I didn’t speak about, It’s that apart from being a solution to write application without coding, it also deploys applications in cluster environments. But still I would rather use Rancher (if we need a cool and easy dashboard) or Kubernetes.
All in all, I liked Spring Cloud Data Flow and, as all Spring solutions, they are really well done and work really fine.