
Kogito - Travel Agency Example
The Travel Agency application is becaming the most relevant and complete example in the Kogito workshops and tutorials so far. This is because it makes use of most of the component in the Kogito ecosystem from UI to Data Index.
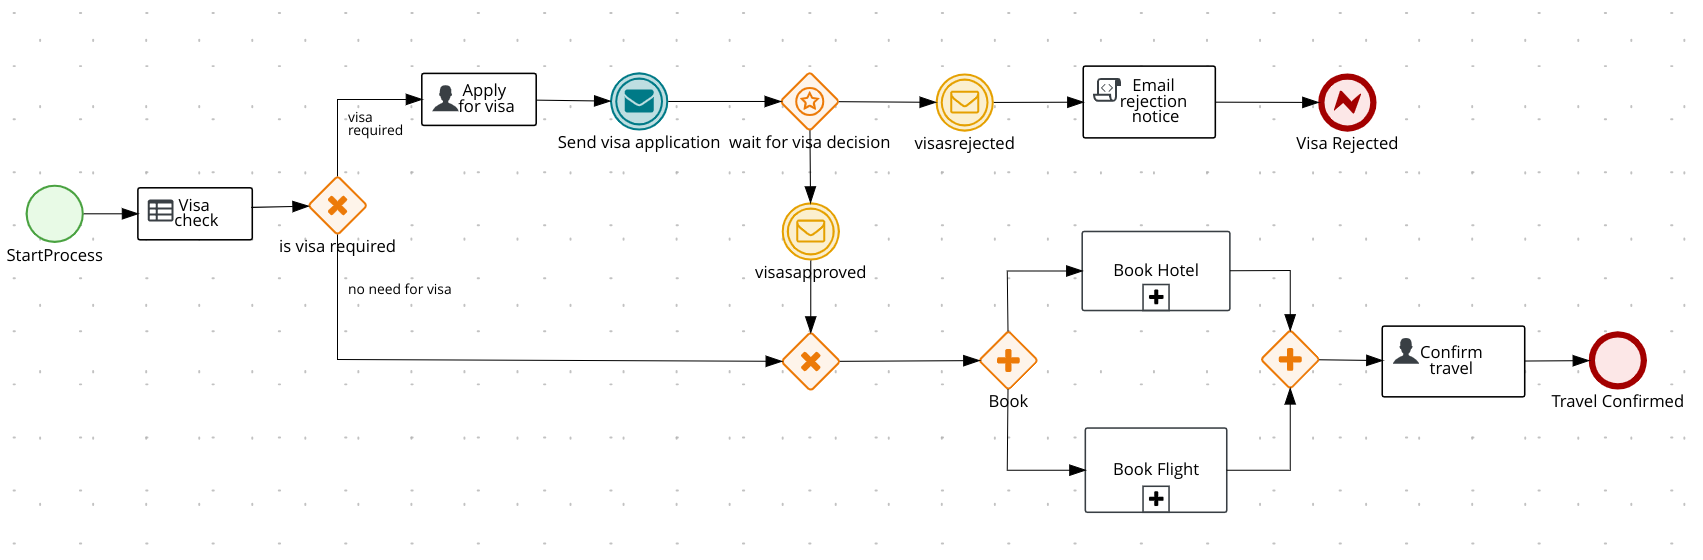
Basically, the application will check whether a person needs a VISA to travel. If so, the request will be on hold until the agency submit the VISA for this person. Then, it will book the hotel and the flight. Finally, it will require a user confirmation (somebody from the travel agency) to proceed.
In this tutorial, we’ll see how to create the example from zero using VS Code (so we can use the latest BMPN editor from Kogito Tooling and then we’ll deploy the example using the Travel Agency github source.
Requirements
Kogito Extension in VS Code
Download the latest assets from https://github.com/kiegroup/kogito-tooling/releases
- Select the latest version
- From asset section download the file vscode_extension_kogito_kie_editors_0.X.vsix
- Open Visual Studio Code
- Select the Extensions pane on the left
- Click the… icon on the top right
- Select Install from VSIX…
| There is also a chrome extension where we can edit the diagrams directly from the browser. |
Let’s start!
We’ll see an overview of how to design a Kogito application, but not all the components in this example. To see the whole source code, go to the github repository from Kogito.
- Create the Maven project
mvn io.quarkus:quarkus-maven-plugin:1.3.1.Final:create \
    -DprojectGroupId=org.acme.travel \
    -DprojectArtifactId=kogito-travel-agency \
    -Dextensions="kogito,openapi"
cd kogito-travel-agency
This command will create a quarkus application with the next extensions:
- Kogito: to enable Kogito capabilities
- Openapi: to expose its API description through an OpenAPI specification using Swagger UI.
Let’s first build and run the application:
mvn compile quarkus-dev
Expected output:
2020-01-25 15:46:07,051 INFO  [io.quarkus] (main) kogito-travel-agency 1.0-SNAPSHOT (running on Quarkus 1.3.1.Final) started in 2.651s. Listening on: http://0.0.0.0:8080
2020-01-25 15:46:07,054 INFO  [io.quarkus] (main) Profile dev activated. Live Coding activated.
2020-01-25 15:46:07,055 INFO  [io.quarkus] (main) Installed features: [cdi, kogito, resteasy, resteasy-jackson, smallrye-openapi, swagger-ui]
- Think on business first
All about Kogito and Business automation is about to think on businesses first based on rules. So, let’s create a decision table or spreadsheet, so we can decide when a traveller requires VISA or not.
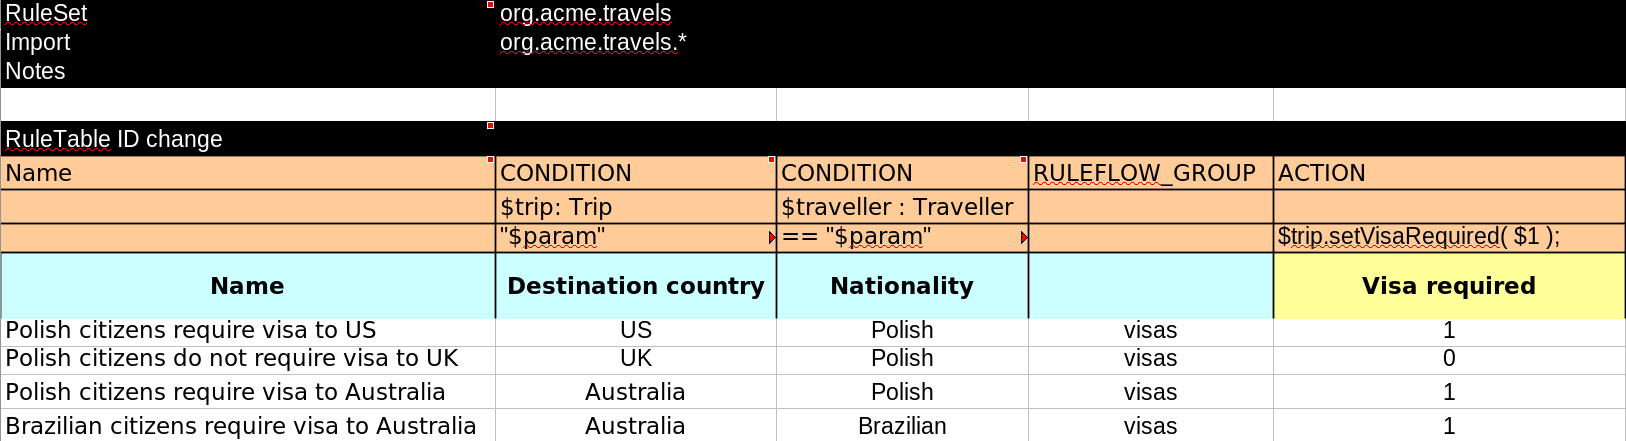
| Pay attention to the RuleSet, Import and the conditions. This is what Drools engine uses to trigger the rules. |
Basically, if we are Polish and we go to either US or Australia, we require VISA. Otherwise, if we go to UK, we don’t.
Let’s add this spreadsheet as visa-rules.xls into src/main/resources/org/acme/travels. Example of this file can be found here.
Also, we need to add the following dependency in the pom.xml:
<dependency>
      <groupId>org.kie.kogito</groupId>
      <artifactId>drools-decisiontables</artifactId>
</dependency>
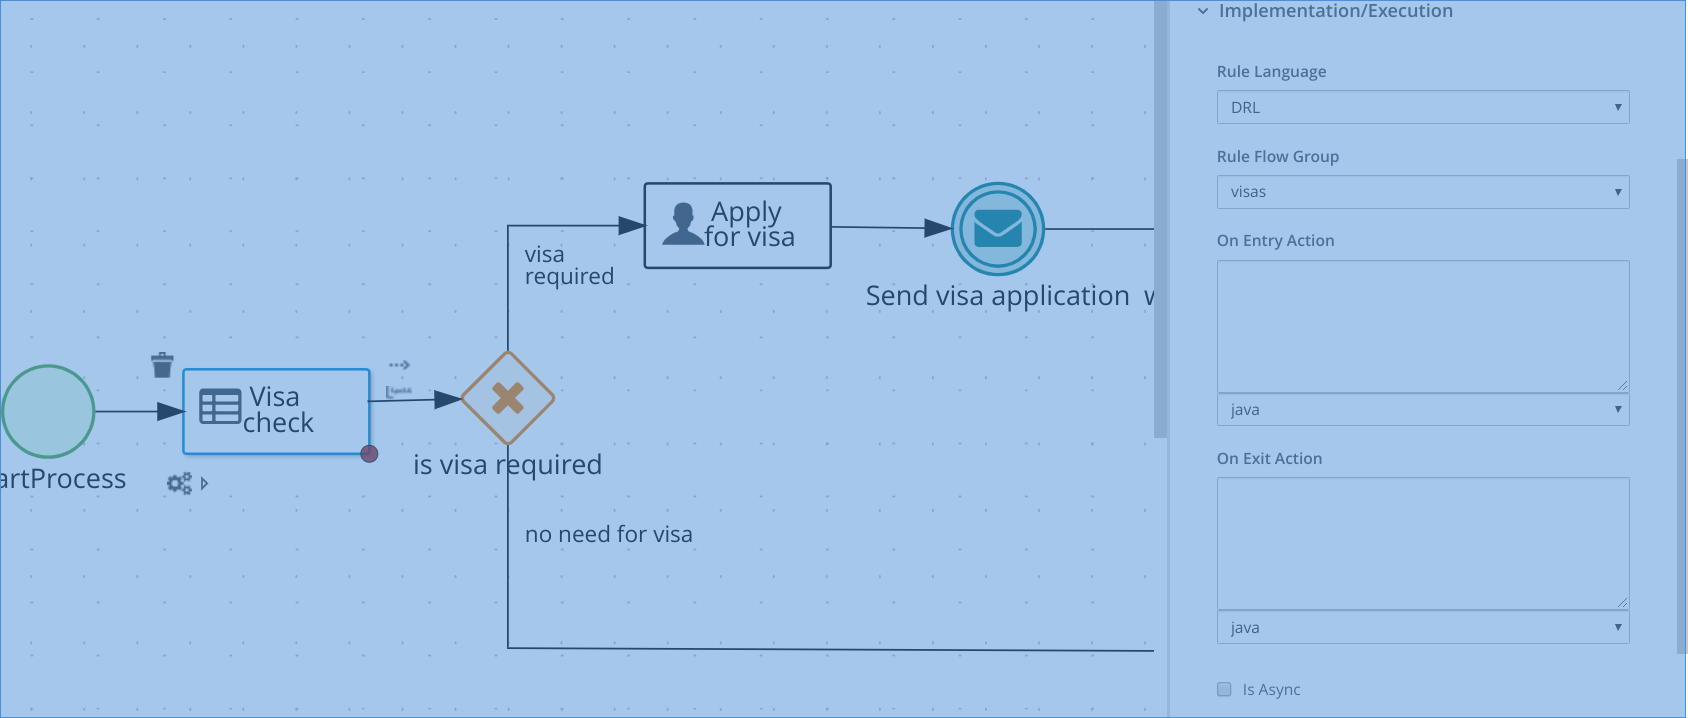
And this is how we make use of it in the diagram:
- Prepare the model Java classes
All the below classes must be created in the package org.acme.travels.
Traveller.java:
public class Traveller {

	private String firstName;
	private String lastName;
	private String email;
	private String nationality;
    private Address address;

    // constructors, getters and setters
}
Address.java:
public class Address {

	private String street;
	private String city;
	private String zipCode;
    private String country;

    // constructors, getters and setters
}
Trip.java:
public class Trip {

	private String city;
	private String country;
	private Date begin;
	private Date end;
    private boolean visaRequired;

    // constructors, getters and setters
}
VisaApplication.java:
public class VisaApplication {

	private String firstName;
	private String lastName;
	private String city;
	private String country;
	private int duration;
	private String passportNumber;
	private String nationality;
    private boolean approved;

    // constructors, getters and setters
}
Flight.java:
public class Flight {

	private String flightNumber;
	private String seat;
	private String gate;
	private Date departure;
    private Date arrival;

    // constructors, getters and setters
}
Hotel.java:
public class Hotel {

	private String name;
	private Address address;
	private String phone;
	private String bookingNumber;
    private String room;

    // constructors, getters and setters
}
- The “Book Hotel” and “Book Flight” services
Let’s divide the problem in smaller units. Looking at the diagram, we’ll work out in this area:
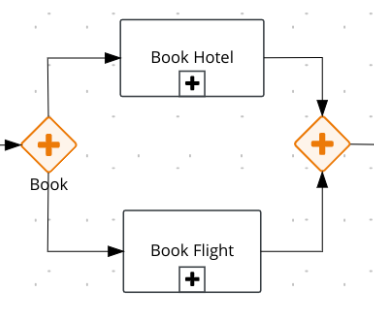
- The “Book Hotel” component
This component will call to the “bookingHotel” diagram as we can see in the properties:
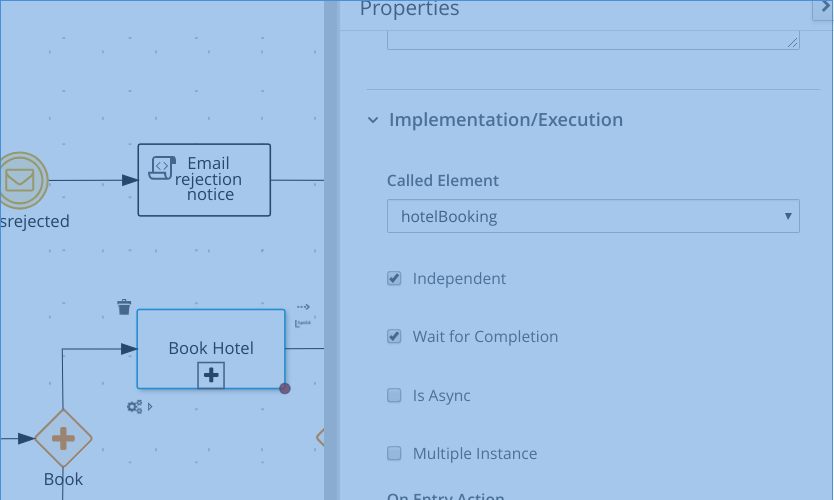
So, we need to create another diagram called bookingHotel.bpmn2 with id “bookingHotel”:
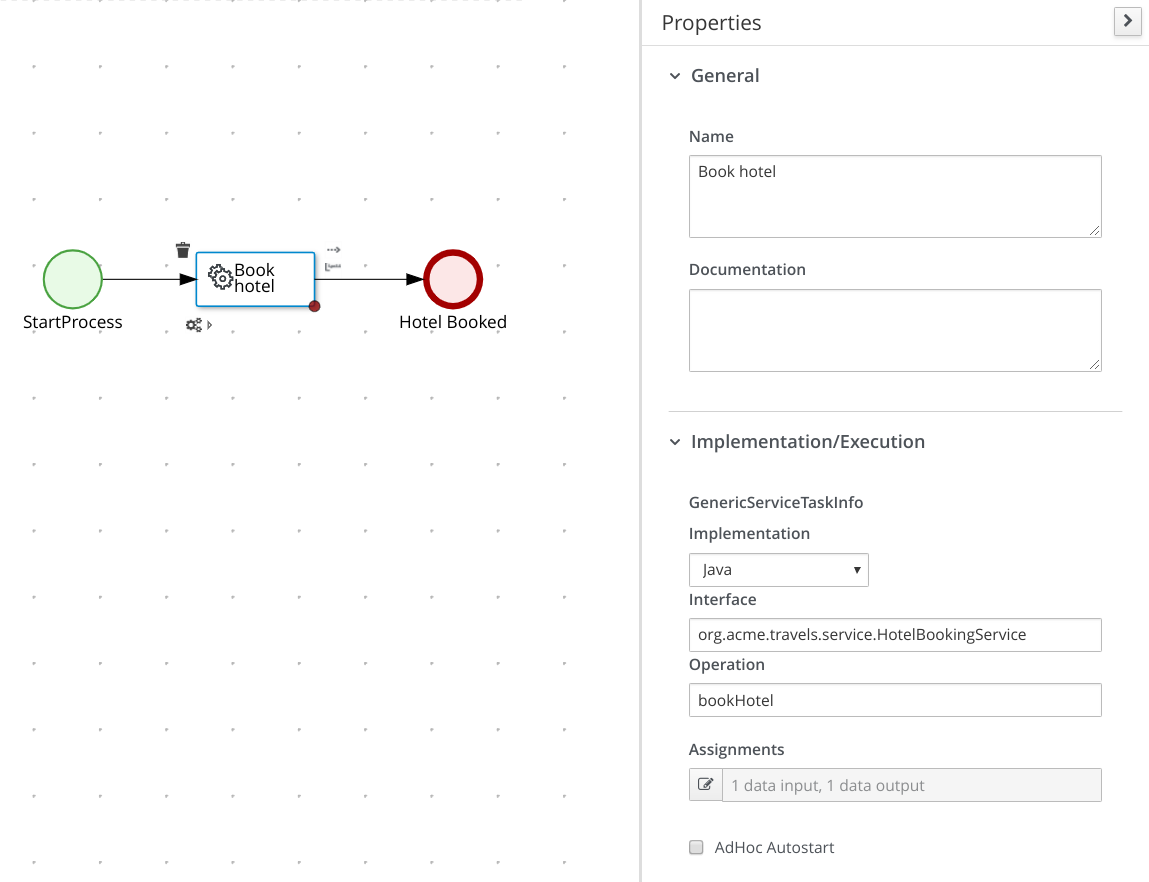
And this component will invoke the service org.acme.travels.service.HotelBookingService and method “bookHotel”. Let’s create it:
@ApplicationScoped
public class HotelBookingService {

	public Hotel bookHotel(Trip trip) {
		return new Hotel("Perfect hotel", new Address("street", trip.getCity(), "12345", trip.getCountry()), "09876543", "XX-012345");
	}
}
| Pay attention to the assignments. This is how we wire all the components each other. |
- The “Book Flight” component
For this component, the same as we did for “Book Hotel”, but it will use this service instead:
@ApplicationScoped
public class FlightBookingService {

	public Flight bookFlight(Trip trip) {
		return new Flight("MX555", trip.getBegin(), trip.getEnd());
	}
}
5.- Create services:
package org.acme.travel.service;

import java.util.Date;

import javax.enterprise.context.ApplicationScoped;

import org.acme.travel.Flight;
import org.acme.travel.Trip;

/**
 * FlightBookingService
 */
@ApplicationScoped
public class FlightBookingService {

    public Flight bookFlight(Trip trip) {
        return new Flight("MX555", "1A", "16A", new Date(), new Date());
    }
}
And:
package org.acme.travel.service;

import javax.enterprise.context.ApplicationScoped;

import org.acme.travel.Address;
import org.acme.travel.Hotel;
import org.acme.travel.Trip;

/**
 * HotelBookingService
 */
@ApplicationScoped
public class HotelBookingService {

    public Hotel bookHotel(Trip trip) {
        return new Hotel("Perfect hotel", new Address("street", trip.getCity(), "12345", trip.getCountry()), "09876543", "XX-012345");
    }
}
These two services will be used in the subprocesses (second image).
How to Deploy it in Openshift
Basically, the previous section explains how we can design the components in a Kogito Application. Now, we’ll deploy this Kogito Travel Agency from the official github repository by Kogito community.
- Requirements
- Openshift CLI
- Docker
- Kogito CLI
- An Openshift instance and project
- Login to Openshift and Create project
> oc login youropenshiftinstance.com # login
> oc new-project my-jch-travel-agency
- Deploy the Kogito Operator
> kogito use-project my-jch-travel-agency
- Deploy Data Index
This step is basically creating a new instance of the Kogito Data Index component and linking this component to the infrastructure components (using useKogitoInfra field):
> oc apply -n my-jch-travel-agency -f - <<EOF
apiVersion: app.kiegroup.org/v1alpha1
kind: KogitoDataIndex
metadata:
  name: data-index
spec:
  # For more information please read: https://docs.jboss.org/kogito/release/latest/html_single/#con_kogito-travel-agency
  replicas: 1
  kafka:
    # will set this instance to auto provision an infra structure in the namespace
    useKogitoInfra: true
  infinispan:
    # will set this instance to auto provision an infra structure in the namespace and attach Infinispan credentials to it
    useKogitoInfra: true
EOF
- Deploy Travels and Visa Kogito app
Travels:
> oc apply -f https://raw.githubusercontent.com/kiegroup/kogito-examples/master/kogito-travel-agency/extended/operator/travels.yaml
Content:
apiVersion: app.kiegroup.org/v1alpha1
kind: KogitoBuild
metadata:
  name: travels
spec:
  type: RemoteSource
  gitSource:
    contextDir: kogito-travel-agency/extended/travels
    uri: "https://github.com/kiegroup/kogito-examples/"
  # set your maven nexus repository to speed up the build time
  #mavenMirrorURL:
---
apiVersion: app.kiegroup.org/v1alpha1
kind: KogitoRuntime
metadata:
  name: travels
spec:
  infinispan:
    useKogitoInfra: true
  kafka:
    useKogitoInfra: true
Visas:
> oc apply -f https://raw.githubusercontent.com/kiegroup/kogito-examples/master/kogito-travel-agency/extended/operator/visas.yaml
Content:
apiVersion: app.kiegroup.org/v1alpha1
kind: KogitoBuild
metadata:
  name: visas
spec:
  type: RemoteSource
  gitSource:
    contextDir: kogito-travel-agency/extended/visas
    uri: "https://github.com/kiegroup/kogito-examples/"
  # set your maven nexus repository to speed up the build time
  #mavenMirrorURL:
---
apiVersion: app.kiegroup.org/v1alpha1
kind: KogitoRuntime
metadata:
  name: visas
spec:
  infinispan:
    useKogitoInfra: true
  kafka:
    useKogitoInfra: true
| Note that Openshift will use the GIT source from Github directly and build the app by us. |
- Visit the Travel URL
We can watch the build status running:
> watch oc get build
After the build of the above apps is completed, the routes will be exposed to be publicly accessed.
> oc get routes
Output:
NAME         HOST/PORT                                                                          PATH      SERVICES     PORT      TERMINATION   WILDCARD
data-index   data-index-my-jch-travel-agency.xxx             data-index   8080                    None
travels      travels-my-jch-travel-agency.xxx                travels      http                    None
visas        visas-my-jch-travel-agency.xxx                  visas        http                    None
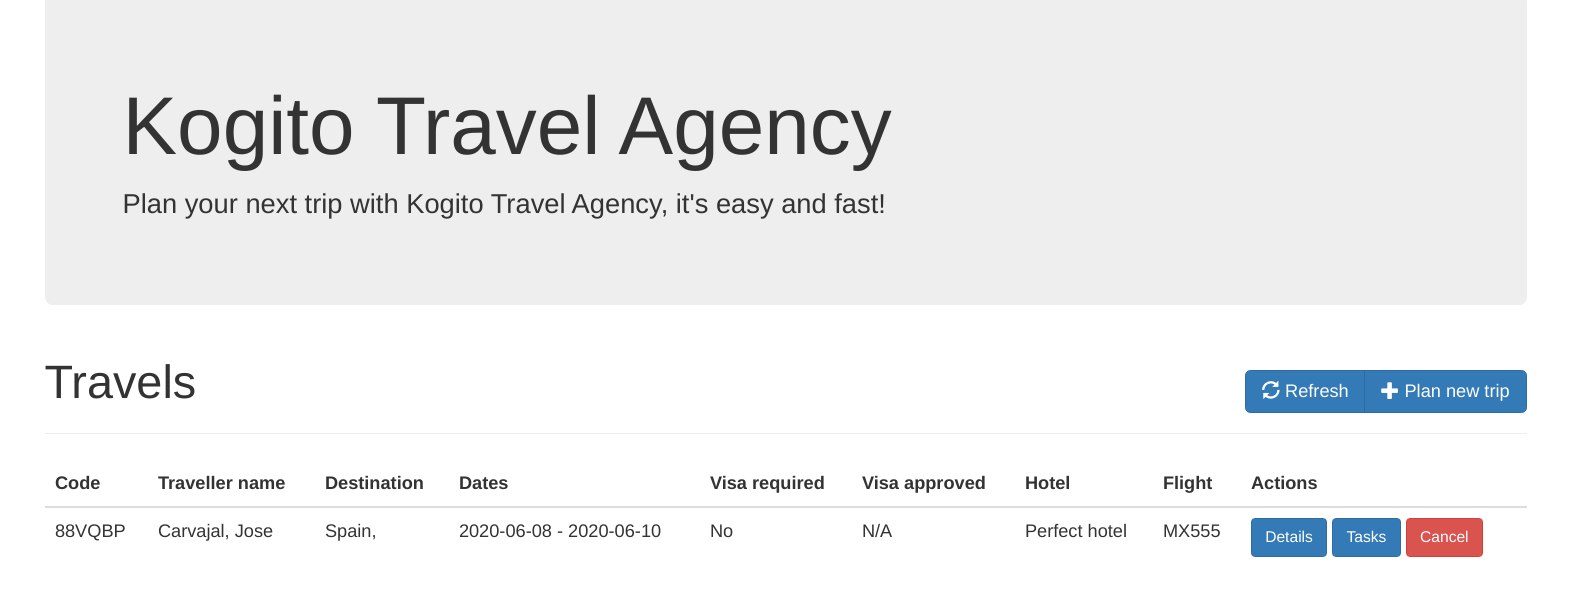
And we’re done! We can now browse to travels-my-jch-travel-agency.xxx and visit the page:
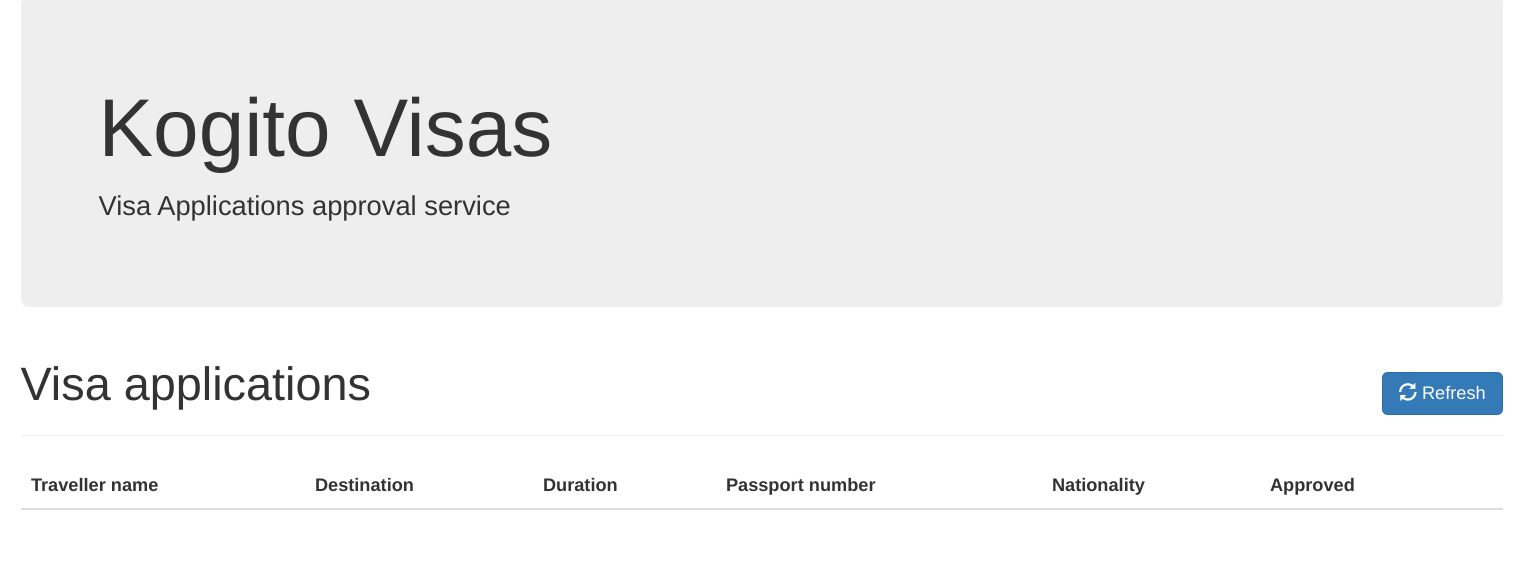
And the Visa webpage:
Play a bit with this example. Try to scale down and up the components and have fun!
Conclusions
What have been done internally? Kogito is Cloud ready and there are images to build/deploy the apps that ease/hide some complexity. Let’s explain a bit about this:
- Build Kogito Runtimes: this will produces a JAR and also some proto files (in target/classes/persistence) to register the DTOs in Data Index and Infinispan
- Inject proto files into the watched folder, so Data Index will register the new types into Infinispan
- Deploy the Kogito App: at the moment, Kogito supports quarkus and spring boot applications :)